Introduction to Section III
Kenabres has been liberated. The Fifth Crusade has begun. You just channeled the power of a goddess and made everyone with you do it to. Nice. Now everything changes.
In this section, you begin the army battles. You start with a pep talk for the troops by Queen Galfrey, and you find out that you have been appointed as the Knight Commander.
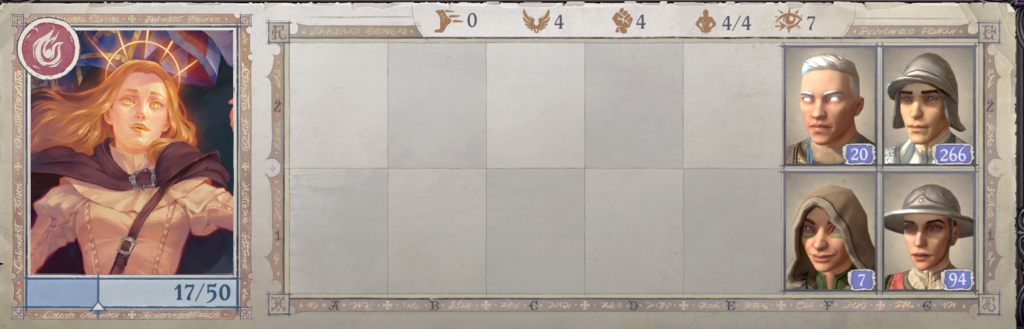
When moving on the world map, you will have two flags at the top of your screen. The one on the left lets you move your group, the one on the right puts you in command of your armies. I am not going to detail every army you are going to come across, nor go over the army battles. If you have played any of the Heroes of Might and Magic games you will be familiar with the mechanics, and if not, there are dozens if not hundreds of books and websites out there to detail every bit of strategy. In this game just keep in mind, the number on the left side of the army is an indication of how difficult they are going to be to defeat.
Tip: There are a lot of great things to buy your characters here, but save your money. You will need to buy new troops whenever you can, and Generals get very expensive very fast. The party still has quests and adventures to do and they can pick up better equipment there, but it is the army that is your primary means of moving forward in the storyline now. On the flip side, be careful not to get so involved in the party quests that you forget to move your armies. They only have so many movement points per day and you don’t want to leave them idle.
Tip: Absolutely spend the 7500gp to get the troops from Irabeth. You get 100 footmen. Footmen cost 15 Finance Points apiece which is 75gp. You get them at cost and you get them now. A larger army will take fewer losses.
Strategy: When you exit the camp you will be on the world map. Your main army is in Kenabres, and if you have given Irabeth the gold to bring in more troops, you will have a smaller army in the camp. There will be 44 archers and 66 footmen available to recruit. Get them all and hire a General. Now join your two armies if you got the extra troops.
Characters and Recipes and Books, oh my
NPCs Found Here
- Sosiel Vaenic Cleric (Acolyte) NG
- Regill Derenge Armiger/Hellknight (Chelaxian Diabolist) LE
- Arueshalae Espionage Expert (Bounty Hunter) CN
Recipes
- Glowing Croissant restore all hp.
- Moss Pottage +3 on all Skill checks
- Midnight Soup +1.5hp/lvl
- Godspeed Salad +10 to Move Speed
- Curse Pilaf +1 to Attack rolls
Books
- Zacharias “Toward Eternity” (+1 Competence bonus to DC of spells with the Death descriptor)
- History of the Worldwound (it says it gives a +1 Insight bonus to Lore (Religion) and Lore (Nature) checks, but my characters only seem to get the bonus to Religion, probably a bug)
- Crusade Chronicles (+10 hp)
- Know Thy Enemy (A Crusader’s Brief) (+1 Insight bonus to Perception and Stealth checks)
Locations/Events
- Crusader's Camp
- Nightingale Grove
- Conundrum Unsolved
- Moondance Meadow
- Insonspicuous Camp
- Underground Hideout
- Army Storm
- Party Storm
- 1st Wilderness Encounter
- 2nd Wilderness Encounter
- 2nd Time You Return to Camp
- Outcast (cont. from Section II)
Player Quests
- The Beginning of a Long Road
- Notes for the Storyteller (cont. from Section II)
- Restoring a Broken Gold Buckle (cont. from Section II)
- Irabeth's Scabbard (cont. from Section II)
- A Farewell
- Queen Incognito (1st time you return to camp)
- The League of the Inspiring Cart (cont. from Section II)
- Cold Waters (cont. from Section II)
- By Hell's Ordinance
- More Than Nothing (Nenio Companion Quest, cont. from Section II)
- The Music of the Abyss (Leper's Smile)
- While the World Burns (Daeran Companion Quest)
- Banner Over the Citadel
- A Strike From the Sky (Lost Chapel)
- From a Dead Woman's Hands
- Attack on Drezen
- In Pursuit of the Past
- Secrets of Creation
- From a Dead Woman's Hands
- Crescent of the Abyss
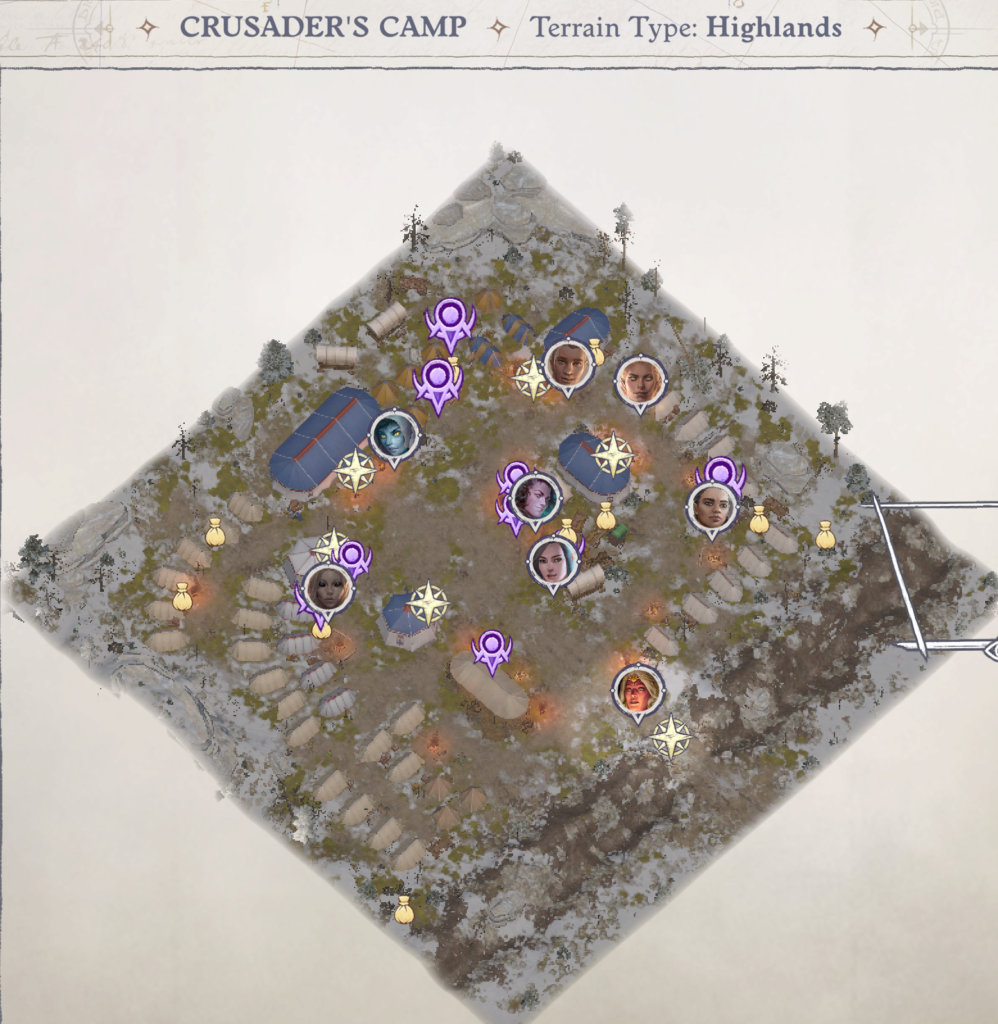
Crusader's Camp
Your first introduction to the camp is Queen Galfrey's pep talk for the troops. In this talk, she appoints you as Knight Commander of the Fifth Crusade. Then she gives you a quest The Beginning of a Long Road wherein she wants you to tour the camp and get to meet all of your troops, your quartermaster, and finally, talk to her.
There are several loot stashes around camp. SE of the field medic tent a DC 15 Perception check will reveal a note titled “May Kenabres Be Damned,” written by someone who holds Kenabres responsible for the shameful treatment of the mongrels. In the far East corner (outside the trench), a DC 18 Perception check will reveal some treasure. About midway along the SW side, a DC 20 Perception check will reveal some treasure.
Before completing The Beginning of a Long Road quest
Important Conversations in Crusader's Camp (before)
- Storyteller – Talking to the Storyteller and giving him the elven script you found in the Gray Garrison lets you complete the quest Notes for the Storyteller. After receiving the Notes, he gives you a new quest, In Pursuit of the Past, where he wants more pages covered in Elven script.
If you have the artifact piece and five Magic Essence (which you should have picked up in the Gray Garrison), you can complete the Restoring a Broken Gold Buckle quest.
- Seelah - Seelah is drinking and joking with a few of the troops. You have the option of chastising her, joining her, or ignoring the behavior. Joining her is a Chaotic action, chastising her is a lawful action. If you ignore the behavior, Irabeth will step in and chastise her. Seelah puts Irabeth in her place rather effectively.
- Wilcer Garms – This is the Quartermaster for the camp. Horace Gwerm is constantly badgering him about his job, but Wilcer doesn’t seem to care. You can buy and sell items here.
- Count Daeron – When you approach his location, the count will make one more effort to spur a romantic relationship between the two of you while protesting that he will absolutely not be accompanying you on your march with the army and pretending nonchalance.
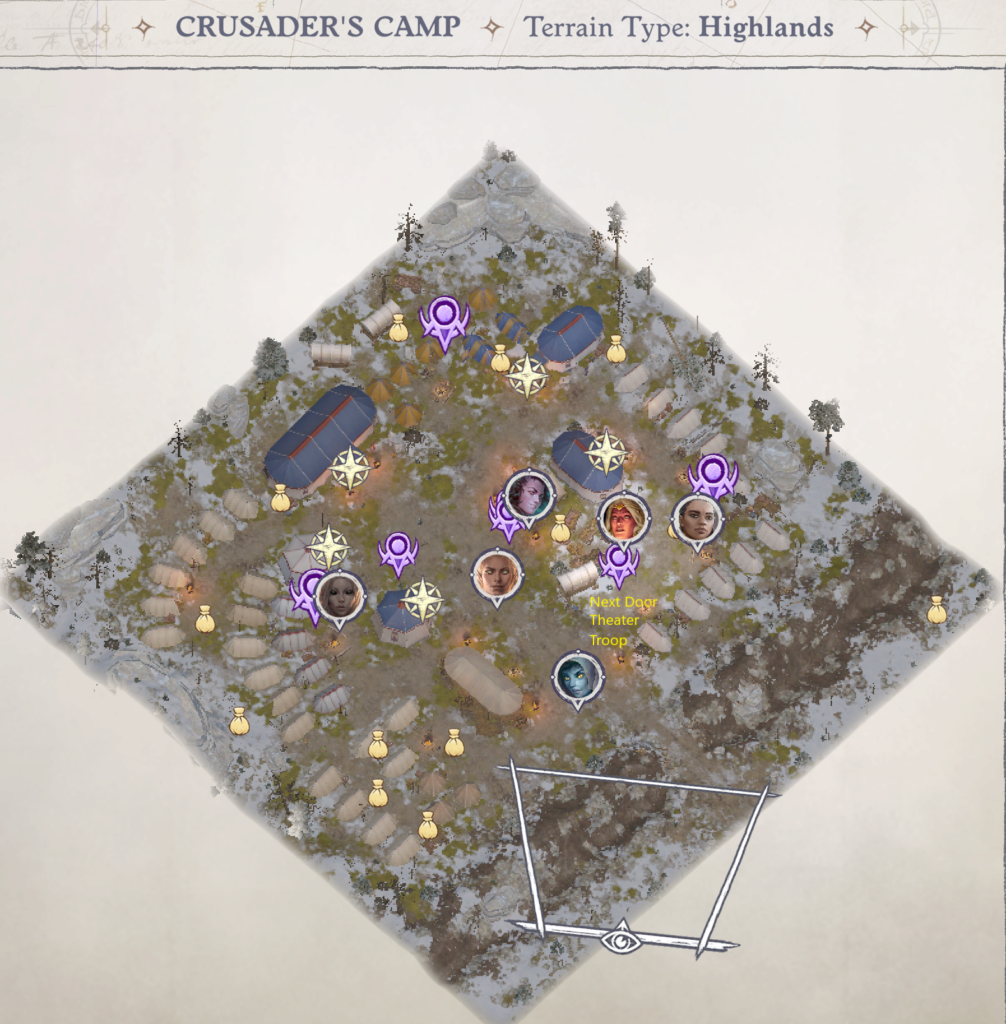
- The Next-Door Theater – In the area of the Nerosyan Recruit’s encampment, you will find the performing group that you rescued from the basement in the Market Square of Kenabres (if you rescued them). You finally get to see Lambkin, their lead performer; he is a cyclops. You will be asked to choose the performer representing you in their new play about your exploits. Other than for the show, your choice doesn’t affect anything.
- Jernaugh - Jernaugh simply repeats what he told you at Defender's Heart, that he is going to Chilly Creek to be their priest. If you didn't talk to him at Defender's Heart then Chilly Creek will be revealed on your map at this time.
- Queen Galfrey - After touring the camp, you talk to Queen Galfrey. For details of this conversation see The Beginning of a Long Road.
Notable Locations in Crusader's Camp (before)
- Commander’s Tent – Your personal chest is here with all of the items that you put in it while at Defender’s Heart. There are several loot stashes in this tent also. Queen Galfrey is here along with Liotr Hawkblade – an Inquisitor of Iomedae, Nurah Dendiwhar – a historian, and Sosiel Vaenic – a cleric. They will not talk to you until after you’ve completed The Beginning of a Long Road quest and spoken to Queen Galfrey.
- Chapel Tent – There is an alter here to each of the major gods. There is also a consecration center here so that anyone resting in camp will reduce the amount of corruption they are experiencing.
- Field Medic – Vissaliy Rathimus and Camillia are in this tent. Camillia won’t engage in conversation. Vissaliy has a lot of new items for sale, including a recipe: Glowing Croissant.
- Nurah Dendiwhar’s Tent – This is the historian that Queen Galfrey is going to send with you on your campaign, she brought a lot of books and some treasure that is ripe for the taking.
- Tirabade’s Tent – Inside the tent is a suit of Half-Plate of Vigor (+2 Half-Plate, adds +2 to the wearer’s Constitution). Irabeth explains that she didn’t want such a luxurious tent, but Queen Galfrey insisted that she act like a commander.
- Eagle Watch Encampment – Other than some loot sitting around, there is nothing of interest here. Ember does seem to be doing a good job of raising the Crusaders’ morale.
- Nerosyan Recruit’s Encampment – Seelah is here telling a tall tale to some of the recruits over a flask of ale. Irabeth disapproves. You have the option of exerting your authority as Commander [Lawful], joining in the drinking [Chaotic], or doing nothing. If you exert your authority or join in it doesn't seem to have any game effect other than the alignment adjustment. If you do nothing, then Irabeth will step in and chastise Seelah. Seelah puts Irabeth in her place rather forcefully pointing out that she doesn't work for Irabeth, she works for you and if you don't have a problem, the Irabeth can just step off.
- Encampment of Kenabres Soldiers – Nothing of interest here.
After completing The Beginning of a Long Road quest
Important Conversations in Crusader's Camp (after)
- Anevia - The correct answer to her question is 'Dangerous'. The answer doesn't have any game effect, whether right or wrong, but it's nice to be right.
- Irabeth – You can fulifill the Irabeth’s Scabbard quest. You can also give Irabeth 7,500gp for her to hire wizards to transport more troops to your army quickly. This adds 100 Footmen to your available troops. I highly recommend doing this.
- Liotr Hawkblade – He is an Inquisitor, second in command to Hulrun. He wants to talk to you about an old case that he worked on when he was much younger. You have an opportunity to take the quest While the World Burns here, and investigate the happenings at Heaven’s Gate and how Count Daeron lived.
- Nurah Dendiwhar – She is in her tent and is a historian. She has studied every detail of the Worldwound, and has written a biography of Lord Axilar Trezbot, a hero from an earlier crusade. She would like to write your biography also. She has a lot of information about the previous four crusades.
- Sosiel Vaenic – A new potential party member. When you talk to Sosiel he has a request, he would like to visit a cemetery to say goodbye to his fellow clerics that died defending the church where he served. This gives you the companion quest A Farewell, and reveals Martyr Zacharius Cemetery.
- Horace Gwerm – If you finished the Gwerm Family Secrets quest in Kenabres, Horace is grateful to you and gives you the Amulet of Blackened Mirror (adds +1 to DC of any Hex cast by wearer).
- Woljif - When you ask Woljif about the new powers, he has a great idea about how to use them to make money. If you don't like the first idea, he has another one. You have some responses that will affect your alignment you can make, or you can respond neutrally.
- Wilcer Garms – When you approach him, there may be a hooded female talking to him (if you did not kill Kaylessa in Section II's quest, The Outcast). She disappears as soon as you get close enough. She is apparently a spy looking for one of the elf recruits.
- Hilor – You can gain more information about the Spinner of Nightmares.
- Count Daeron – Mostly he seems relieved that you haven't dismissed him. It seems that even Count Daeron does not want to have that kind of reputation among the nobility. If you have accepted the quest While the World Burns, you can ask him about Heaven's Gate and he will immediately invite you to accompany him. He wants to have a birthday celebration there and is hoping you will attend.
- Forn Autumn Haze - He can be found in the Field Medic tent. He has decided to stick around and find other evildoers (if you killed Kaylessa), or continue his hunt for Kaylessa.
Notable Locations in Crusader's Camp (after)
- Blacksmith – He doesn’t talk, but you can buy just about any kind of Cold Iron and Masterwork weapon from him.
- Chapel Tent – There will be a couple of loot stashes in here (offerings to the gods?), and the recipe for Glowing Croissant if you didn't buy it from Vissaliy.
- Field Medic - Camillia is no longer here, but Forn Autumn Haze is.
(back to locations)
Nightingale Grove
As you move into the grove you see two Marauders arguing over booty. They spot you and run. The Marauder Leader comes out and tells them they had better get back here and fight or he will kill them himself. The leader then turns invisible.
Marauder Leader (Fig 5 Rog 4), Marauder Alchemist (Alc 6), Marauder (Bar 4 Fig 1), Marauder (Fig 5).
The Marauders are carrying some very good equipment; two +1 Chainshirts, +1 Light Hammer, Cloak of Resistance +1, Momentum (+2 Light Hammer, on a confirmed critical all members of the wielder’s party are affected as though by a Haste spell for 1d3 rounds), Blood Clarity (Cloak of Protection +2, whenever the wearer lands a killing blow he or she becomes immune to mind affecting effects for 3 rounds), and Moss Pottage, a recipe.
Looking around the camp you will find a bunch of mundane treasure, a Magical Essence, and a note to the noble who has gone to war and neglected his duties at home.
Conundrum Unsolved
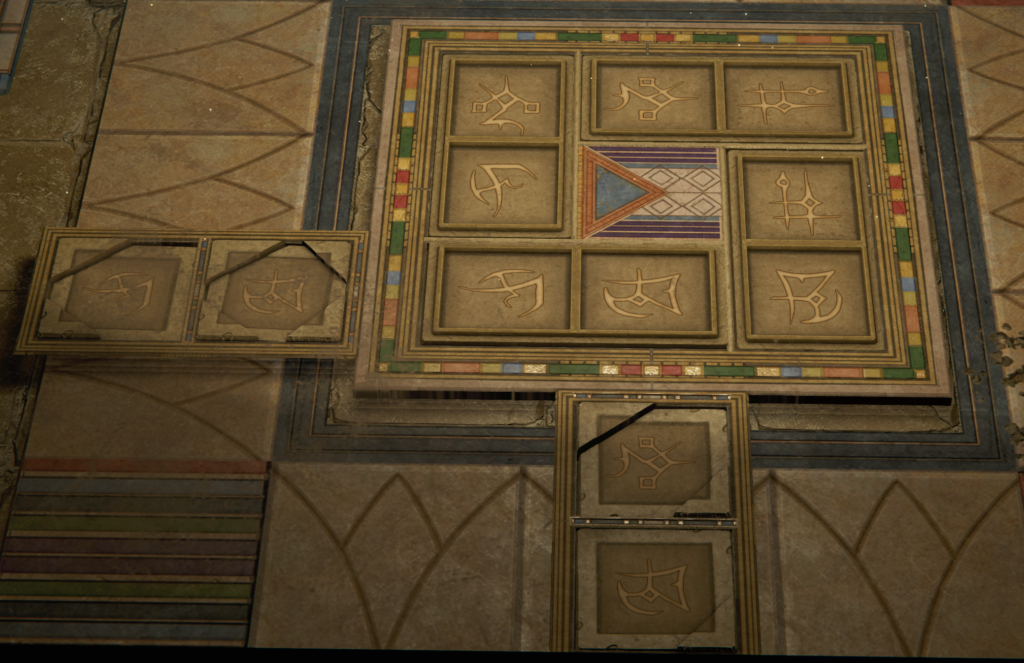
There are a couple of dead Adrikilandru here with some minor treasure on them. Of real interest though is the cave located near the molten rock spewing mound near the center of the map. Inside the cave you will find some more mundane treasure, then a doorway into a manufactured area. If you go to the canopic jars you can get the pieces to solve the puzzle in the center of the floor. The solution is shown to the right with the map facing North. The placement of the tiles in the outer parts is easy; you are only offered one choice when you click on these areas. The four inner tiles are a little more difficult because you are offered four choices and they all look the same in your backpack. If you hover over one of the pieces you will be able to see the actual design on that piece. Once you place one tile, you will only be given one choice for each of the rest of the areas, so it becomes much easier. (If you don’t get any choices, click on the other hand for the tile placement. Each section has two hands to choose from.)
Completing the puzzle opens a door to the North. A ghost appears and says that you’ve just solved an easy puzzle to whet your appetite to solve the mystery of the Universe. Heart of Mystery is revealed on your map, and you are given the quest, “Secrets of Creation”. If Nenio is with you she is really excited about the prospect of solving a riddle and knowing everything there is to know. The ghost won’t answer any questions.
Inside that room are two sarcophagi. In one is +2 Hide Barding (medium armor for mounts), in the other is a piece of elven script. There is also minor treasure in each of these.
Moondance Meadow
A quick battle against two Plagued Smilodon (Undead 14) and you can collect some minor treasure and a Keen Composite Longbow +2.
Inconspicuous Camp
South of where you enter the map is Crinukh’s camp. He is the ‘friend’ that left you the note. He is also a Kobold. At his camp location are some Elven Notes (see quest In Pursuit of the Past in Section IV).
When you talk to Crinukh he doesn’t talk like a normal Kobold. He seems well educated and friendly. His offer to you is that he can provide you with information that will help you in your mission to destroy the demons. But, before giving you anything useful, he asks you a hypothetical question, “What would you do if you discovered that an old friend was in fact a traitor?” You can give one of four answers here, each representing one of the major alignments. Crinukh’s reaction to any answer other than Chaotic is that you are a fool or naïve. The only useful thing to do with a traitor is to get as much information from them as you can.
After the hypothetical question, if you agree to accept his help, Crinukh lets you know that the demons have two stashes in Drezen; one near the entrance to the fortress, and one near the entrance to the Citidel. If you decide to attack him, Crinukh teleports away before battle begins.
In the SW corner of the map, a DC 30 Perception check will reveal a loot stash that contains a Wand of Dimension Door, Mass with 10 charges and some other, minor treasure.
Underground Hideout
To the West when you enter the map is a Stranger looking out over a ravine. He? She? It’s hard to tell, gives you the same cryptic response as always then walks away. There is a tree fallen across the ravine which doesn’t do anything.
Moving South you will come across a body strung up on a tree with a Mwrk Dagger. At the far South end is a trail leading down into the ravine and a Gored Corpse. A DC 19 Perception check will reveal that the corpse was tortured to death by an expert.Moving North in the ravine a DC 18 Perception check will find a trap just past another body strung up in a tree. A DC 19 Trickery check will disarm it. The body has no treasure, but if you move East from the body you will find some loot including a Magical Essence.
Entering the Underground, you will see an Incubus (Outsider 8). Careful because there is a second, invisible Incubus that will attack you as soon as battle is joined. They have standard equipment. Past them, a DC 17 Perception check will reveal a trap easily disarmed with a DC 19 Trickery check.
At the bottom of the path you will be attacked by two Will-O-Wisps (Aberration 9). (If they don’t attack you, move around the area and they should appear.) It is a good idea to fight them now rather than engaging the enemies to the East first, because the Will-O-Wisps will come to their aid if they aren’t dead. They have no treasure.
Continuing to the East, a DC 16 Perception check will reveal a trap which can be disarmed with a DC 18 Trickery check.
At the bottom of the path you will see two Incubus and Sivial the Pain Connoisseur (Cle 11 Outsider 8). Sivial has Chainmail of Commradery (+3 Chainmail, +2 damage when flanking an enemy, if you have the Outflank feature it is +4 damage), a Belt of Physical Flow +2 (affects Str and Dex), and a Cloak of Resistance +2.
There is a lot of mundane loot around. A DC 28 Perception check on the table West of Shivial will reveal that the body is wearing a Righteous Crusader’s Ring (+1 use of Smite Evil ability per day if wearer has Smite Evil ability). A DC 24 Lore (Nature) check on the same table will show that the body was tortured for weeks before dying.
Army Storm
Once your army has been through a few battles, you will get a message that a storm caught a group of crusaders unaware and killed most of them. This will lower your army moreale by10 points. There is nothing you can do about this, except move your party to their next quest. This will give you an opportunity to get the 10 points back.
Party Storm
After your party has been to a couple of locations, you will have a cutscene where you, the commander, are faced with a terrible storm. The army is losing faith and terrified. Looking at the storm you can see that it doesn't appear to be entirely natural and there is not way to avoid it. A successful DC 20 Diplomacy or Athletics check lets you get through the storm with minimal losses and raises your army's morale by 10 points. Failing on the check costs 10 morale.
1st Wilderness Encounter
Eventually as your characters move about the map, you will have this encounter.
It seems that three soldiers, Tran, Velhm, and Asty, have found a safe area to camp and rest. They seem cheerful and invite you to join them and get some well deserved down time. If you succeed at a DC 24 Knowledge (World) check you will notice that something about the way Tran expresses himself seems off. If you succeed at a DC 22 Perception check you will notice that this is the perfect camping place, but something still doesn’t seem to be right about it. If you sit down with them or try to leave you will join them at their fire and they will offer you tea.
If you succeed at a DC 24 Lore (Nature) check you will know that the ingredient in the tea is a drug. If you drink the tea, Asty the cleric will offer to heal you. If you succeed at a DC 23 Perception check you will notice that something about her doesn’t seem quite right. (Are you getting the picture here?)
If you accept her offer, she will heal some of your wounds and cast Bless on you… which lasts for only a few seconds. Then your wounds reopen, you start choking, and you vomit up the poisonous tea. You take a -6 penalty to Str and Dex. Tran, Velhm, and Asty then change form to reveal that they are Drow and two Drow Magus come out of invisibility to attack you. (Seelah complains that she didn’t sense the evil in the Drow, they mock her saying that fooling Paladin’s senses are easy, Camilla lets them know that it isn’t as big an accomplishment as they want everyone to believe.)
If you don’t accept her offer, but instead try to leave again, you must make a DC 20 Will save or be affected as though you had drunk the tea.
If you attack them, or when you attack them, you will be facing Tran (Fig 6), Velhm (Rog 5), Asty (Fig 6) and two Drow Magus (Magus 5) initially. After the first round a Drow Knife Master (Rig 5) and Drow Crossbowman (Fig 6) [up on the cliffs] come out of invisibility and attack. Then a third Drow Magus starts shooting at you from the cliffs. When you try to move to the cliffs to take out the crossbowman and magus, two Drow Knife Masters will attack from invisibility. (I found that if your group is hasted you can get to the top of the cliff and kill the shooters before the Knife Masters can get into position to attack.)
Their equipment is standard except for the bows used by the Magi; they are Cold Iron Mwrk Composite Longbows. There are several loot stashes in the area with mundane treasure. There is a hidden stash just South of center on the West side which a DC 25 Perception check will reveal, and another on the East side at the edge of the cliffs that requires a DC 21 Perception check. Both of these stashes also have mundane treasure.
(back to events)
2nd Wilderness Encounter
You are stopped during your travels. At the center of the map are two Babao Demons (Outsider 7). You can find an engraved bracelet worth 50gp on the East side of the map. There is a campsite to the North. At the campsite is a note written from “A Friend” asking you to visit him at his campsite. Inconspicuous Campsite is revealed on your world map.
2nd Time You Return to Camp
You are brought to the Commander’s Tent and a disheveled young man, Yaker, is there. He claims to be a Hellknight under the command of Paralictor Regill Derenge, and his squad is under attack and in danger of being wiped out. He begs your help.
Irabeth says they are alies so you must help them. Anevia says he can’t possibly be a Hellknight.
If you agree to help him you get the quest By Hell’s Ordinance and the location of their camp, Reliable Redoubt, is revealed on your world map.
After this encounter, if you talk to Wilcer Germs and ask him about the state of the camp he will tell you that the equipment assigned to the various groups by regulations is not correct for the Worldwound. You can leave the decision of how to equip them to Wilcer, insist that troops be equipped according to regulation, or order horses and ropes for all the scouts. If you order horses and ropes you will get a new unit of 30 mounted scouts.
(back to Events)
Outcast (cont. from Section II)
If you did not kill Kaylessa in the Market Square of Kenabres (Section II) you will occassionally see an unknown elven woman talking to various people in camp; Hilor and Wilcer Garms in particular. When you try to approach her she curses and teleports away. When you question whoever she was talking to, all they can say is that she is looking for her brother who has been wounded. Eventually you will see her talking to Anevia when you enter the Commander’s Tent.
Anevia is not as easily fooled as the others, and when the elven woman notices you, Anevia grabs her teleportation device before she can use it. This is Kaylessa. Now that you have confronted her, she requests that you two talk alone.
In summary, Kaylessa is trying to find out where Forn is. You have the same options you had in Kenabres; attack her, let her go, or warn her that Forn is in the camp and she should be careful. If you don’t attack her, she will leave to continue her mission.
Player Quests
The Beginning of a Long Road
Once you have visited all three of the encampments and the quartermaster (Wilcer Garms), you need to talk to Queen Galfrey in the Commander’s Tent. She will first tell you that your goal is to take Drezen back from the demons, and to recover The Sword of Valor. She will introduce Liotr Hawkblade – an Inquisitor of Iomedae (you will get the quest While the World Burns from him before he leaves), Nurah Dendiwhar – a historian, and Sosiel Vaenic – a cleric (he will give you the quest A Farewell before he leaves). They will all ask to speak to you later, then Queen Galfrey will dismiss them along with Irabeth to talk to you personally.
If you offer The Covenant of the Inheritor to the Queen, she will take it from you, and you get 230xp. If you ask her what she will be doing while you fight the war, you will have the opportunity for a (good) action following the Angel Mythic path or a (lawful) action following the Aeon Mythic path and invite her to fight by your side. This will lead to the quest Queen Incognito and she will become part of one of the armies disguised as a common soldier. After you are done asking questions, Queen Galfrey brings forth Count Daeron and lets him know that he has been appointed as an advisor to you. (This means he can’t leave, but will be available to your party unless you dismiss him, causing him great shame among the nobility.)
Drezen is revealed on your world map and the queen leaves. Anevia enters. You can converse with Anevia. The answer to her question is "Dangerous", but it doesn't really matter how you answer.
You are now able to rest in the Commander’s tent. You can engage in dialogue with your companions. When you go outside the tent, there are several new loot stashes, and you can leave camp. Note that the Storyteller is no longer in camp: go to After the Quest is Completed.
Restoring a Broken Gold Buckle
When you give the Storyteller the relic piece found in the SW Quadrant of the Market Square and five Magical Essences, he fuses them into The Covenant of the Inheritor (All party members within 30 feet get a +2 to Caster Level checks to overcome Spell Resistance, their weapons become Good aligned, and overcome damage resistance as though made of Cold Iron).
Notes for the Storyteller
When you give the elven script recovered from the Gray Garrison to the Storyteller, you gain experience and the Storyteller will tell you a story about his past and the event of Earthfall when the elves left their homeland.
If you ask the storyteller if you can tell you any more, he gives you the quest In Pursuit of the Past where he wants you to gather more elven scripts for him. He will then let you know that he has to go and take care of something, but he will see you again.
(back to Quests)
A Farewell
When you get to Martyr Zacharius Cemetery there is a funeral in progress for the fallen clerics of Shelyn. After Sosiel says his piece, regardless of your response, a Zombie Lord (Fig 3 Undead 2) starts rising from one of the graves. The townspeople panic and run. You see six more Zombie Lords rise and follow them out of the cemetery, then combat begins. You will fight a total of nine Zombie Lords coming from all sides. They don’t all attack at once, so it is just a matter of cutting them down quickly enough to get to the next one (I like the Haste spell for this). They all have Mwk Scimitars and Heavy Shields.
Once the battle is done, Sosiel points out that the zombies went after the villagers and you have to help them. Moving East you will see a gate that leads into the village.
Before you go through the gate, to the South is a DC 18 Mobility check to jump over a fence. On the other side of the fence is treasure worth about 205gp.
Before you go through the gate, you hear someone crying out from inside one of the crypts to the North. It is a dowager who believes she was buried alive, but in fact was inadvertently made into a zombie by the necromancer that caused the other zombies to rise. She is not happy about her new circumstance and will give you her jewelry (worth 625gp) if you put her back to rest. (Sosiel will take care of the job, so don’t worry about how to do it.) If you choose not to put her back to rest, she will be with the Zombie Lord that is to the North after you go through the gate, but she will have no treasure. Unquiet Dead (Undead 2).
Once you are through the gate, head North. There is a single Zombie Lord there harassing one of the villagers. An easy kill. South of that location in a cul-de-sac to the East is another Zombie Lord harassing a villager. When you move to attack him, six more Zombie Lords will come from the South and attack. They don’t come in a single group, so, like the cemetery, kill them as fast as they arrive and you shouldn’t have too much trouble.
When that battle is over, Sosiel will run to a stack of crates and note that there are guards at the front door to the Temple, you will see one Skeletal Champion Archer on a platform and two Zombie Lords. In fact, there are two Skeletal Champion Archers and three Zombie Lords. That may not seem like much, but the Skeletal Champion Archers are 6th level fighters (two attacks per round) and wearing Scalemail. Sosiel points out that there may be another way in, and indicates a trellis leaning on the wall of the Temple.
In the cul-de-sac where the last Zombie Lord was is a chest with 297gp worth of treasure.
If you decide to go through the front door: The best strategy for this is to continue South, hugging the East end of the map. From this position, you will be able to see the staircase going up to the platform the Skeletal Champion Archer is on. Send the entire group up to attack it. The three Zombie Lords will come around the corner and attack any archers or spellcasters you have left behind, and the second Skeletal Champion Archer will begin peppering your fighters on the platform. Take out the archer as quickly as you can, then send all of your fighters but one back down to help your archers. Send the other fighter to the second Skeletal Champion Archer. That fighter will get a lot of attacks of opportunity in addition to his or her own attacks. Once the Zombie Lords are done, send everyone else to finish the job.
When you walk into the Temple you will see the necromancer assuring the villagers that dying for Baphomet isn’t that hard, and Sosiel will go nuts. Sosiel runs toward the undead and destroys them all freeing the villagers so they can flee. Narty, the necromancer, welcomes Sosiel and scoffs at him, then raises up more undead to attack you. Near him are two Zombie Lords (Fig 2 Undead 2) and a Skeletal Champion Archer (Fig 3 Undead 2). He is a 5th level Wizard. Near the entrance are two Zombie Lords (Fig 3 Undead 2) and a Skeletal Champion Archer (Fig 3 Undead 2).
If you decide to go around back: The trellis is a DC 16 Athletics check. Once you get on top of the first tower, go down the stairs and there is a locked chest with about 142gp worth of treasure. Then head West to a ladder with a DC 15 Athletics check. This will bring you to a rooftop where you can move to a stone platform overlooking Narty (Wiz 5) as he tells the cowering villagers that all they have to do is die for Baphomet and it isn’t that difficult. Sosiel goes nuts, runs down the stairs and destroys the undead allowing the villagers to flee. Your party is brought to the bottom of the stairs, and Narty raises more undead to defend him. A single Skeletal Champion Archer (Fig 3 Undead 2) near him, two Zombie Lords (Fig 3 Undead 2) and a Skeletal Champion Archer (Fig 3 Undead 2) near the entrance.
The undead out front will not be there once you have dealt with Narty.
After the Battle: After you have defeated Narty and his minions, Sosiel begins punching him repeatedly. It seems that Sosiel and his fellow clerics healed Narty and thought he was a faithful follower of Shelyn. Narty scoffs at Sosiel because he has surrendered which means Sosiel can't kill him. Sosiel’s goddess forbids it. All of the dialogue comes down to three choices. You can either execute Narty on the spot, have him taken into custody, or set him free. I’m sure that if you take him into custody or set him free, that will have game consequences later, but I don’t know what they are yet. If you execute him, he has no other treasure other than what he gave you when pleading for his life.
(back to Quests)
Queen Incognito
If you have convinced the queen to accompany you on your crusade, then when you return to camp after leaving once, you will be met by a messenger from Queen Galfrey. He will let you know that the queen is in disguise as a regular soldier and staying with the lesser knights (The Eagle Watch). She has requested to speak with her at your first opportunity.
You can get some history here. You can flirt with the queen, but she's not interested. ("I find you intriguing" is Pathfinder speak for flirting.) You can offend her and end the conversation prematurely. ("I thought you should risk your life since you're risking ours", then a comment about her age seems to do it.)
In the end what you get out of the conversation is 400xp. Later, when you attack Drezen, the queen will lead the vanguard through the front gate, but she doesn't tell you that at this time.
The League of the Inspiring Cart
When you enter the Houndheart Campsite, there is loot to the East of your position which a DC 20 Perception check will find. It is about 79gp worth of treasure. Elan and Jannah meet you, Elan is nervous because you are the commander now. Curl is not with them. They let you know that they are going to start searching for the ring (which is a Master Garek original) to the North.
There are several other loot spots in this area. A DC 20 Perception check will reveal three concealed loot stashes at the South end of the map, just East of center, the SE corner of the map, and the East side of the map, center. For the most part the loot is just treasure items, although there are a couple of useful potions. A DC 20 Mobility check at the NW corner of the map will get you to an area where a DC 20 Perception check will find the treasure held by the dead knight on the ground. Some valuables, a couple of potions of Cure Lt Wounds, and Divine Protector (+2 Mithral Heavy Shield, gives the wielder DR 5/magic). On the upper West side of the map is a chest containing a Melted Shard of a Ring which is an artifact piece that can be shown to the Storyteller and possible reassembled.
A tent on the West side of the map looks different from the others when you inspect it. Inside are two Brimoraks which will attack if you look at the tent a second time. They have standard treasure.
The ring is in the chest located at the North end of the map, center. When you approach the chest a Quasit (Outsider 2) appears and starts cackling about how the ring is his. The Quasit disables Elan and Jannah with a Color Spray, then flies off to the South daring you to catch him. If you follow the Quasit to the SE corner, he will then fly West and end up at the tent where you fought the Brimorak’s. Finally the Quasit flies back to the chest where he originally appeared.
Elan and Jannah are awake, but when they try to grab the Quasit, Curl appears and grabs the ring. When he tries to run away with it, Elan loses it and tries to attack Curl. Seelah stops him, but Jannah runs off. Curl summons three Babau demons (Outsider 7) who join the Quasit in trying to kill you. You can kill the Quasit now, but the ring is gone.
After the battle you have a lot of dialogue where Elan warns you about the dangers of having aquired your powers so quickly and he leaves. Seelah wants to talk to you when you get back to camp.
When you get back to camp and talk to Seelah, she is having a crisis of faith. It looks like Curl is still a thief, Jannah has deserted, and Elan is no longer her friend. You have the option of a (good), (lawful), (evil), or neutral action here. Seelah's response will differ according to what you say, but you get 400xp regardless and the quest is finished.
(back to Quests)
Cold Waters
When you enter the outskirts of the village of Chilly Creek you find Jernaugh standing near some trees studying them. He seems interested in some ceremonial items that the villagers have hung there, but doesn’t know anything about them. After the dialogue, he takes you to the village.
At the entrance to the village you see six villagers fighting a Hydra (Magical Beast 5). They coordinate their efforts expertly and slay the beast quickly. You can try to help, but most of the time they have killed it before I’ve been able to get my fighters in position, so use archers and spell casters. There is a brother and sister, Markyll and Malessa, that seem to be in charge of the operation. When you talk to them they do admit that they occasionally have a problem with Hydras, but Icy Rill, the creek that runs by the village, helps them by weakening any threats that might come out. Jernaugh seems a bit uncomfortable with the way the villagers refer to the waterway as though it were a living entity, but he doesn’t object. This completes the quest and you get 230xp.
If you decide to attack, you will fight Markyll (Rng 5), Malessa (Rng 5), Jernaugh (Cle 4), and ten Villagers (Humanoid 2). Markyll and Malessa have some potions of Cure Lt Wounds and masterwork weapons, Jernaugh has some scrolls and mundane equipment, none of the villagers have anything.
Running about the village and taking everything you can find gets you a lot of mundane treasure, Oppressor’s Gloves (+2 on Persuasion checks used to Intimidate, any time the wearer confirms a critical hit the target takes a -2 penalty to saves vs. mind affects for two rounds), and a recipe for Godspeed Salad.
In the hills overlooking the village you can fight a bunch of wild nasties. Three Ferocious Wolves (Animal 2), two Dire Wolves (Animal 5), and an Alpha Wolf (Animal 7) are on the East hills. Farther South in the East hills are two Megaloceros (Anim 4) and a Ferocious Megacoceros (Anim 4) that won’t bother you unless you attack them. You can get Corrupted Animal Meat (a cooking supply) if you kill them. There are a few Elk (Anim 3) about that you can also get meat from. Moving West you will meet a Plagued Smilodon (Undead 14) and a Plagued Bear (Undead 10) that have wiped out a pack of Wolves.
By Hell’s Ordinance
After conquering a few areas (specifically, once you take the demon fort on the West side of the Sellen river and kill the level 3 demon army located South of there), you will eventually return to camp to rest and sell your items. You will be immediately brought into your tent to hear the report of Yaker, a Hellknight of the Order of the Godclaw under the command of Paralictor Regill Derenge. Their camp is under attack by gargoyles and they need your help to survive. If you throw him out you will not get this quest and Regill will not be available to your party. If you agree to help then Reliable Redoubt will be revealed on your world map.
When you get to Reliable Redoubt you can examine some bodies to see that the Hellknight who had been taken to the air by a gargoyle continued fighting until both fell to their deaths. They have some mundane loot. Yaker is there and asks you to look at the camp.
In camp you see a priest trying to get the wounded to safety before the gargoyles attack again. Paralictor Regill tells him that they have no time and kills the wounded to relieve the priest of his conflict. Then the gargoyles attack. Yaker says that the soldiers will find cover and he runs to help.
Three Gargoyles (Mon Hum 5) and a Gargoyle Hunter (Mon Hum 5) drop from the sky and attack you as you try to follow Yaker. They have no treasure.
Further down the path you encounter a Fiendish Gargoyle Hunter (Mon Hum 5) and two more Gargoyle Hunters. They have no treasure.
When you get to the bottom of the path you see a Sunrise Sword Priestess breathing her last. Yaker comments on how weak Mendavians are. You can heal her (good), ignore her (evil), or question her. Healing her does no good, she still dies. Questioning her gives you the story of how they fell in with the Hellknights and the brutal treatement they received from them. She tells of how they attempted to help them and how her high priest, Ashus, was killed trying to heal the wounded. (If you have Wenduag, Camillia, and Daeron with you, their commentary is hilarious in its complete disregard for anybody but themselves.) On the High Priest’s body is Full Plate Armor and the Bastard Sword of Hope (+2 Mithral Bastard Sword, whenever the wielder confirms a critical hit the sword heals him or her of 1d8+5 damage. This sword can only be wielded by LG, LN, or NG characters.)
When you get to the camp, there are three Gargoyles, a Gargoyle Hunter, and a Half-Fiend Gargoyle Cleric (Cle 4 Mon Hum 5). Three more Gargoyles and a Gargoyle Hunter will drop in a round after the battle begins. (I really like the Haste spell here.) There is a lot of mundane treasure laying about the camp. Several potions of Cure Lt Wounds, some scrolls, a Magic Essence, and Muscle Warmer (+2 Hide Barding which gives Cold Resistance 10 and a +2 competence bonus to saving throws vs. movement impairing effects). Note that if you don’t ransack the camp before entering the cave, Regill will have everything rounded up except the supplies of the killed soldiers and you will not get any of it.
The cave where the Hellknigts and Sunrise Priests have sought cover is in the SE corner of the map. In the cave you will find Paralictor Regil Derenge, several Hellknights, and Sunrise Sword Priests. The Paralictor warns you that the gargoyles will be staging another attack in five to six minutes.
The battle in the cave has new reinforcements coming in every round, both at the entrance to the cave and in the midst of the soldiers. (Another time where Haste is going to come in handy because your characters are going to be moving back and forth a lot to deal with the threat.)
- Start of battle: Two Gargoyle Hunters appear on the path leading out of the cave.
- 2nd Round: Two Half-Fiend Gargoyle Hunters (Mon Hum 5), and a Half-Fiend Gargoyle Cleric (Cle 4 Mon Hum 5) drop into the main cave area.
- 3rd Round: Three Fiendish Gargoyle Hunters and a Half-Fiend Gargoyle Cleric land at the entrance to the cave.
- 4th Round: Two Half-Fiend Gargoyle Hunters and a Gargoyle High Cleric (Cle 8 Mon Hum 5) drop in to the main cave area.
The Gargoyle Clerics have scrolls of inflict wounds; the Gargoyle High Cleric has a Headband of Inspired Wisdom +2.
After the battle, Regill takes command of the situation dispatching forces to take an inventory and report losses, then he turns to you. If you challenge his decisions concerning the Sunrise Sword Priests he points out that he is in command and does what is best for his forces. When you ask him what he intends to do now, he tells you that he has to deal with a personnel issue. Yaker is called before Regill and given a double salary bonus for his resourcefulness in bringing you to help out in the battle, then sentenced to 100 lashes for abandoning his post. You have the option of chastising Regill for being too harsh at the wrong time (chaos), pointing out that Yaker also left his armor behind (evil), or letting Regill deal with the situation on his own. If you say that the punishment is too harsh, not only Regill, but Yaker will disagree with you. If you point out that Yaker left his armor, 10 lashes are added to the punishment and Regill is pleased that you two understand each other. If you let Regill deal with the matter without interference, he is again pleased that you respect his command.
Regill then lets you know that he wants to take command of the Sunrise Sword priests. You can give him command by taking a lawful action (“You have command”), chaotic action (“Let them choose”), or saying you don’t care. If you take the Good option and say that you want the Sunrise Priests under your own command they will join you and you will get a unit of 5 Clerics.
If you dismiss Regill then he will not be available as a party member, nor will you get any Hellknight units. If you say that you want to join forces with Regill he will be available as a party member and you will get a unit of 10 Hellknights (or 7 Hellknights if you got the Cleric unit).
There is a DC 23 Mobility check South of the battle area. If you fail at this check, each party member takes 3d6+12 Piercing damage, but you make it across. On the other side is a Sunrise Sword Crusader who is happy that he is alive. A corpse nearby has a couple of ingredients and a Ring of Protection +2.
(back to Quests)
More than Nothing (Nenio Compaonion Quest)
Going down the path into the Nameless Ruins, you will encounter two Ghoul Stalkers (Rog 6 Undead 2), two Ghoul Creepers (Rog 3 Undead 2) and a Ghoul Huntmaster (Rng 6 Undead 2) in front of a cave. There is some minor treasure near them, they have standard equipment.
The Cave: Going East from the entrance to the cave you encounter five Ghoul Creepers and see a weird symbol on a pillar. The symbol matches the design of the riddle further down the trail, but doesn’t seem to do anything (do note, however, that the outer ring is glowing brighter than the rest of the design). They all have leather armor and there is some minor treasure in the back.
Still in the cave, if you go North from the entrance and turn East, you will find two traps blocking your way into the room. If you try to disarm a trap by moving around it, you will be attacked by a Plagued Smilodon (Undead 14) and a Ghoul Huntmaster if they detect you. Stealth or Invisibility are good here. If you inspect the remnants of the ghoul’s feast in the center of the room you will have to succeed on a DC 19 Will save. If you fail, the character is Shaken for 12 hours and you get no treasure. If you succeed you get a Ring of Protection +2. In the chests at the back of the room are a recipe for Midnight Soup, a Headband of Vast Intellect +2, and a Cloak of Cleansing (+2 Cloak of Protection, +2 to saves vs. Compulsion and Diseases).
The Stairs: Further down the path, A DC 17 Perception check will reveal some minor treasure, then you have to fight three Gargoyles (Mon Hum 5). Through the arch are two weak Plagued Bears (Undead 10, but only 16hp) next to some minor treasure. The next arch has a trap which a DC 17 Perception check will find (DC 16 Trickery to disarm). Once you’re through the arch, a DC 18 Perception check on the North side of the stairs will find some minor treasure. At the bottom of those stairs, you come across a design on the ground that matches the one you saw on the pillar. The solution is found by looking at the highlighted portions of the design in three other locations: the cave, the backside of the right hand pillar halfway down, and the wall at the bottom of the path. Each of these locations has the design with one portion glowing blue. In order they show the outer circle, inner circle, and two of the bars (this one took some experimenting). Face the lion’s head so that the jaw is at the bottom of the screen, hair at the top. Select the outer circle, inner circle, then the left-hand bars in either order. This will cause a secret area to open. The chest inside contains a potion, an ingredient, and the Phylactery of Positive Channeling (If the character has the ability to channel positive energy, the amount of damage done to undead, or healing done to the living by this ability is increased by 2d6).
Continuing down the stairs you will reach the bottom where there are several of the Mysterious Strangers that have been saying things like “I am the answer, but what is the question” and stuff. When you move to the center of the four pillars, a female elf says one of her sayings, then disappears. Nenio rushes forward and touches the statue and freezes in place. You also touch the statue and you are whisked away to commune with an all-knowing spirit that asks you who you are. Lie, tell the truth, it doesn’t matter. It knows your name and will then philosophically ask you if you are indeed just your name. Then it’s over and Nenio is a Kitsune (a foxlike race) rather than human. Nenio wants to talk to the being again, but to do so you will have to find the masks that go into each of the four pillars.
The four masks are in four different locations: Ivory Sanctum (Section ???), Pulura’s Fall (Section ???), Heart of Mystery (Section ???), and the Ineluctable Prison (Section ???). This will open up a portal to continue the quest. [Yes, I looked this up online. Once I get to these locations I will be able to continue describing this quest.]
The Music of the Abyss (Leper's Smile)
When your party enters this location, you are sent to a storybook. It seems that swarms of Vescavor are inhabiting the valley and they will wipe out your army if you travel through. You have the options of getting more information, but what it comes down to is that one of your NPCs has to take a unit and distract the swarms long enough for you to get into the caves and kill the Vescavor Queen. If you select the option to look at your companions’ faces you will end up with four options; Irabeth, Nurah, Regill (if you rescued the Hellknights and got Regill as a potential party member), Lann (if you chose Lann over Wenduag), or Sosiel.
- Irabeth will have the options of fighting to the last or scattering her troops to distract the swarms as much as possible. If she fights, some troops will live. If she scatters, everyone will die.
- Nurah will have the same options, but either way, everyone dies.
- Regill will have the options to fight to the last or send in bait (Hellknight troops) to get the swarms into vulnerable positions. If he fights, everyone dies. If he uses bait, some will live. Note that if you assign Regill he will not be available for the assault on the Vescavor Queen.
- Lann has the options of fighting to the last or maneuvering and dodging the foe. If he fights, the soldiers panic and everyone dies. If he tries to outmaneuver them, some of the soldiers live. Note that if you assign Lann he will not be available for the assault on the Vescavor Queen.
- Sosiel will have the option to scatter his troops or hold position and heal the soldiers while the Vescavor attack. If he scatters his troops, everyone dies. If he holds position some troops will live. Note that if you assign Sosiel he will not be available for the assault on the Vescavor Queen.
1st Level: Now you get to enter the cave system. Note that this is a time critical mission. The more time you spend exploring the caves, the more of your troops will die and the more morale they will lose. If you thoroughly explore every part of the caves before killing the queen your troops will lose 20 or more points of morale. If you go straight for the Queen, you should be able to limit this to 5 points. For every 5 points of morale that you lose, you also lose 5% of your troops in each unit.
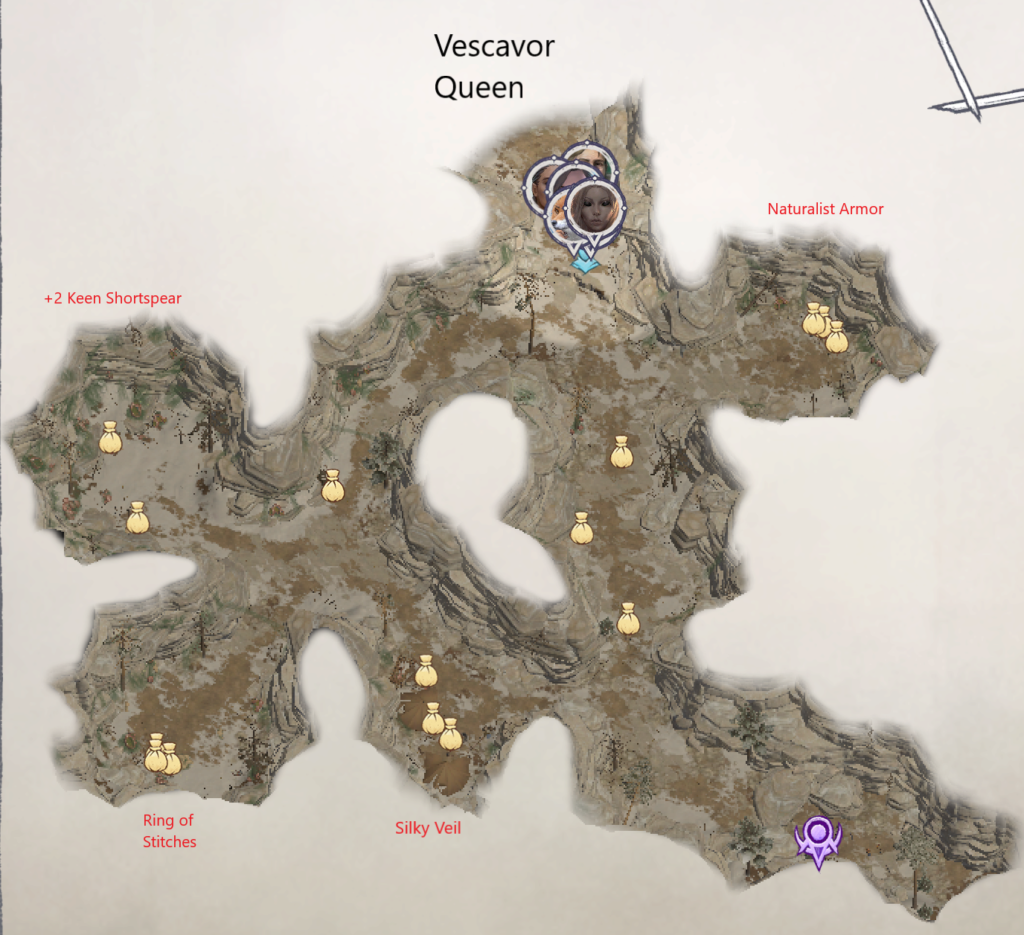
The map shows the location of the important treasures in case you want to quickly grab one or two that you think will be especially useful (and worth the loss of morale and troops). The party shown on the map is standing just South of where the Queen is. Once you go in and kill the Queen, all of the labelled treasure goes away and you are left with just a few ingredients to pick up.
When you first enter, Anevia is standing at the entrance and she warns you that you need to hurry. She also tells you that she will be with you when you get to the Queen who is located at the far North end of the caves. (If you worship certain deities, like Gozreh, you will have the option of calling upon them for help and receiving their blessing.) After the dialogue with Anevia, you may get a chill down your back and a warning that you might want to check your gear (depending on your character class). Sure enough, in your gear is a Perfumed Handkerchief that you didn’t put there. The perfume is the scent of the Vescavor Queen and it will draw the Vescavor to you. You should drop it now.
Just past Anevia is a Vescavor Swarm (Outsider 5).
If you go West you will encounter another Vescavor Swarm. There is some standard treasure there and Silky Veil (+1 Dodge bonus to AC, +2 Enhancement bonus to attack and damage with Unarmed attacks; Can only be worn by Monks) and in another pile is a couple of Cure Mod Wounds potions. If you continue to the West and go South, you will fight some more swarms and the Ring of Stitches (wearer is immune to Bleed). Farther West you will fight a Vescavor Swarm and a Vescavor Royal Guard (Outsider 12). In that area is a +2 Keen Shortspear.
If you go North you wil fight a Vescavor Swarm and a Vescavor Royal Guard. They have some minor treasure. You can do a DC 19 Lore (Nature) check on the plants there to learn that the demonic presence is poisoning the land. You get some xp.
If you go East from that position, you will fight some Swarms. In the area is Naturalist Armor (+2 Studded Leather, +2 Insight bonus to AC vs. plants and vermin).
Before you can get to the Queen, your party will stop at a crevice. A DC 17 Perception check will reveal that there is a halfling trapped down there being attacked by a Vescavor Swarm. If you succeed on a DC 20 Athletics check you can rescue him, but you will then be attacked by the Swarm. You now have the option of healing him, putting him out of his misery, or just leaving him there. There doesn’t seem to be any game effect from your choice except on your alignment.
Further North you get to the Vescavor Queen (Outsider 18). Anevia joins you and starts peppering her with arrows as you attack.
After the Queen is dead, Anevia points out that the odor here seems familiar. It seems that someone slipped a hankie in your backpack with that same odor on it, and it is that odor that attracts the swarms. If you still have the hankie on you, you now lose it. This confirms that you have traitors in your troops that are trying to destroy you (Count Daeron is delighted).
Anevia suggests you destroy the queen’s body because the Vescavor that are consuming her could become queens if they are left alone. You have two options; destroy the body, or [evil] destroy the body but collect some of the scent so that you can use it on a suicide squad of soldiers to draw Vescavor into the area and destroy the demons in Drezen. Note: If you have chosen to include Queen Galfrey in your attack on Drezen, she will not let you do this, even if you collect the sample.
After the queen is burned, Nurah examines the magic circle and determines that the queen was summoned by the same wizard that made the magic circle in the Gray Garrison.
To the North is a body with Hunter’s Assurance (+3 Bleed Composite Shortbow, any hit causes 1d6 bleed damage until healed, on a critical the target suffers a stacking -1 to AC until end of combat). Your time constraint is now over, but only mundane treasure is left in the rest of this level. This finishes the quest, The Music of the Abyss. You can leave or go down to the lower level.
2nd Level: When you enter this level, there is a Vescavor Swarm next to a dead body with some treasure. One of the items of treasure is a note from Harkel saying that he was the leader of the Nasty Waifs and they robbed the Tower of Estrod in Kenabres. All was good, they got away, until one of their members died of a heart attack, then attacked them as an undead a few hours later. The note is a plea for help. The Nasty Waifs are to the West.
West: You will meet a Wight (Undead 4), then a trap, then three more Wights (two on the shore of an underground waterway, the third a little farther on), then you come to a group of three Cairn Wights (Undead 4). A DC 16 Perception check will reveal some treasure. A set of bones near where you kill the Cairn Wights holds a Belt of Incredible Dexterity +2.
Further North you come upon two Cairn Wights, a Wight, and Harkel (Rng 6 Undead 4) who is now undead. This fight is different because they keep reanimating after you kill them. The only way to end the battle is for someone to examine the chests on shore just North of the cart. In the big chest is the Wand of Zacharias. The wand is what keeps reanimating the undead.
When you examine the chest, you will be put into a dialogue box where you can look into the mind of the wand’s owner, Zacharias. You view the scene of his final days when he says that if the wand is returned to him, he will return and fight for Kenabres. [Spoiler: Keeping the wand and returning it to the undead Zacharias is a necessary step if you want to follow the Death Mythic Path.] You can destroy the wand [good, wand is lost, undead are destroyed], release the spirit from the wand [evil, you keep wand, undead are destroyed], or hide the wand in a bag [keep the wand, fight whatever undead have already been animated].
Looking around the area you will find several loot stashes. Of note is Terendelev’s Claw in the wagon (needed for The Dragon's Fate quest - Section IV), the Vessel of Raellas (don't know what it's for yet, but it's important), and a recipe for Curse Pilaf. The Wights and Cairn Wights all have mundane treasure, but Harkel has a +2 Vermin Bane Elven Curved Blade. A DC 25 Perception check to the North will reveal Mind Piercer (+2 Cold Iron Rapier, +1d6 Piercing damage vs. enemies under mind-affecting effects).
North: Just North of the entrance is a +2 Longsword and some ingredients. From there you fight two Vescavor Swarms, then the cave forks. You can’t go North here, because there is a trap that is disarmed in an area that can only be reached if you go West. (If you get past the trap, there is another trap to be disarmed before you can get to the disarm point for this trap. The disarm point is right next to a Derakni (Outsider 11) so make sure you have a really great Sneak bonus or are Invisible before trying to disarm this trap. Otherwise, just go the other way and kill the Derakni first.)
The corridor to the West is inhabited by a Vescavor Royal Guard and three Vescavor Swarms. It then splits into three paths. The corridor to the SW of there is blocked by a trap with the disarm point in the room to the NW.
You have to succeed on a DC 22 Athletics check to get into the room to the NW. Inside you will find a Hunter Retriever (Construct 15). Once you have defeated it you can disarm the trap to the SW, and get Retriever’s Claw (+2 Cold Iron Dagger, Crit multiplier is extended to x3) from the Hunter Retriever. On the East side of the room is a corpse next to a dead Hunter Retriever. The corpse has some treasure and an Amulet of Apothecary (+1 Amulet of Natural Armor, gives a +4 Morale bonus to saves vs. poison).
Past the trap to the Southwest, you will fight two more Vescavor Swarms, then two Vrocks (Outsider 9). In that area you can find the Radiant Kukri (+1 Kukri, does additional 1d6 positive energy damage on a hit).
The path to the NE is inhabited by a Derakni (Outsider 11). There is a corpse with some minor treasure which a DC 16 Perception check will reveal, and a trap disarming point here. There is actually a rather clever arrangement of traps going on here. If you started out going straight North you would have come to a trap with this as the disarm point. Now that you’ve disarmed that trap, you come to another trap. You have to go back to the initial fork and go North to disarm this trap. Beyond that is another trap. Once you have disarmed the traps you will face a Vescavor Swarm and another Derakni. They are guarding Voice of the Hollow (+2 Mithril Heavy Mace, on a confirmed critical all enemies in 30’ other than the target must make DC 16 Will saves or be affected by the Voice of the Hollow for 1d4 rounds [Voice of the Hollow: 50% chance to act normally but take 2d6 Sonic damage, 50% chance to attack the nearest creature]).
While the World Burns
When you talk to Liotr, he tells you that he would like an opportunity to investigate the events at Heaven’s Edge (Count Daeran’s family manor). He investigated them years ago when he was much younger and didn’t know as much as he does now, and several questions remain unanswered. He would like you to talk to Count Daeran and arrange to visit Heaven’s Edge. Liotr will accompany you as an assistant.
When you talk to Count Daeran, he says that he wanted to celebrate his birthday there and was going to ask if you could attend. He thinks it is a splendid idea.
When you arrive at Heaven’s Edge, all NPCs are available on the bottom of the screen just as though you are in camp. Count Daeran is standing at the top of the stairs, and he takes this opportunity to give a speech to celebrate his birthday. You get 180xp.
After the speech, Liotr approaches you and points out two items of interest, Daeran mentioned Nestrin, his family cleric, in his speech even though it is said that he never talks about him, and there has been a rash of severed heads associated with Count Daeran throughout the years. Liotr needs you to get Daeran away from the courtyard so he can cast his spells and learn more.
Although all of the NPCs are present at the party, they won’t engage you in conversation. On the West side of the map, you can do a DC 20 Knowledge (World) check to discover that this mansion looks to have been rebuilt multiple times. You get xp for succeeding on the check. You can find several loot stashes in other places. Some of them are wine, and you are given a hint that maybe you can use the wine to distract Daeran and get him out of the courtyard. In Count Daeran’s chambers (Northwest corner of the map), you can find 203 Diamond Dust (which will be great for casting spells) and Clear Purpose (bracers, the wearer does not provoke attacks of opportunity when casting healing spells and gains +2 to concentration checks). A DC 15 Perception check near the fireplace in the room will also reveal a hidden cache that needs a key to open it. The key cannot be obtained until after you take Drezen (Section IV) and can be given to you by Daeron.
When you talk to Daeran, the first dialogue box doesn’t matter. In the second dialogue box, you have several choices. If you select any choice except the first or last one, Daeran will go to his room. The first choice where you ask about Heaven’s Edge gives you a hint that activating the fire suppression system may distract Daeran. If you want to set off the fire suppression system (which is a neat effect when the Water Elementals come out to douse the fire), select the last choice, “I think I need a stroll,” then go to the bottom of the stairs on the East side and light the wine cart on fire. Daeran goes to his room to change his damp clothes.
If you visit Daeran in his room before talking to Liotr, he will either be changing his clothes, sulking, or busy writing a report.
Liotr is in the courtyard, and he will begin casting his spells after you approach him. The scene you witness is Count Daeran’s birthday party from ten years ago when the plague was released. A Lilitu appears when a noble grasps his throat and dies. The Lilitu lets everyone know that they have the plague and are all going to die. You get 180xp.
Liotr now says that he needs to scan the rooms on the West side of the mansion, and he wants you to see if you can remove anybody in that area. Woljif is in the SW room and won’t engage in dialogue. Count Daeran is in the NW room. When you approach him, you can ask him about the room (first choice), which does nothing, or excuse yourself (last choice) to end the conversation. Any other choice you make will successfully get Daeran out of the room and into the main hall. You get 150xp.
Once Daeran leaves, Liotr enters and casts another spell. This time you witness Daeran at his mother’s side as she dies of the plague. Nestrin refuses to send anyone to town for help and has sealed the gates so the plague won’t spread into Kenabres. Daeran begs his mother to order the gates opened so she can be saved. His mother dies.
When you enter the hall, Daeran is either dancing on the stage with Camellia, dancing on the table with Seelah, arguing with Sosiel, standing by the table sulking about the latest report, or just standing by the table, depending on how you got him out of the room.
Talking to anybody besides Daeran will not open dialogue boxes.
When you approach Daeran, he asks how you’re enjoying the party. After answering, you have the option of challenging Daeran to a drinking contest, demanding another report, or saying that you believe he’s hiding something. Any of these will successfully get him out of the hall. The drinking contest has a couple of twists in that you can challenge him to outdrink you, Seelah, or Lann (if he’s with your party). Unless the challenger is you, and you quit, the contest ends in a tie. Daeran goes outside to get some fresh air. The alcohol doesn’t have any game effect on the contestants.
Liotr then casts his final spells, and you gain 180xp. This time you see Daeran cowering in a corner while the Lilitu taunts him. Nestrin tells the Lilitu to leave Daeran alone, but Daeran seems distracted. An alien voice seems to be offering him a deal. It will save him if he promises to never reveal to anyone what happened here. When Nestrin realizes what is happening, he panics, but Daeran makes the deal and releases a blast of power, killing everyone, including Nestrin. Liotr collapses on the floor.
Talking to anybody before inspecting Liotr will not open dialogue boxes.
Liotr explains everything that you saw. Daeran is not possessed but is a gateway for the alien entity, which Liotr calls the Other. The Other can see through Daeran’s eyes and is responsible for killing Nestrin, three greater demons, and all of the paladins. (Side note, that is why the paladins died despite being immune to disease.) This is the exchange that Daeran agreed to, let the Other see through his eyes, Daeran will remain a gateway, and Daeran cannot tell anyone of the Other’s existence. Liotr will go to Nerosyan and Absalom to research the Other, and he asks you to keep the secret of the Other’s existence. Whether or not you agree, you get 600xp, and the quest is finished.
No one will engage you in conversation, there is nothing left to do. Leave the party and get on with the Crusade.
Note: If at any time in the future you decide to confront Daeran with his secret you (and you alone) will be transported to The Other's Sanctuary and be in a fight. The Other (Undead 40, AC 50 Spell Resistance 40 and a long list of immunities). There is a portal opening that you can escape through if you aren't paralyzed in the first round. If you successfully escape, Daeran instantly dies.
Banner Over the Citadel
The first part of this quest is to deal with the Vescavar Swarm (see The Music of the Abyss quest). Once you have done that, you will need to rescue all of your companions from Nulkineth in the Lost Chapel (see A Strike From the Sky event). Finally you will need to attack and take Drezen (see Attack on Drezen).
A Strike From the Sky
Once you’ve taken the demon stronghold closest to Drezen, your next return to camp will be interrupted before you can sell anything or rest. In fact, if you try to pass over your camp, you will be stopped and this encounter will occur. Your encumbrance is standard for camp, meaning there is no weight limit. If you were fatigued or exhausted when you arrived, that condition will be removed and spells are restored as well as other abilities (like Smite Evil). The camp is under attack by Gargoyles. Only your character and whichever mongrel you have been adventuring with, Lann or Wenduag, will be available to start the fight. You have an opportunity for a DC 13 Knowledge (World) check here to identify the attackers as Gargoyles and get some xp.
When you exit the tent you will see two Gargoyle Hunters (Mon Hum 5) and a Gargoyle (Mon Hum 5) in battle with some of your soldiers. Another Gargoyle lands right in front of you while a third takes one of your soldiers into the air. In the second round of this combat a third Gargoyle Hunter lands to join the fight.
Once that battle is over, you find that barricades have been erected all over camp which limits your movements. Your only real choice is to go North toward the chapel tent. There you will find Camellia standing over the body of a soldier. You talk to her for a bit, then she joins the party and now you are three (and Camellia can heal you if needed).
Your path is set, you now come across a Gargoyle and a Half-Fiend Gargoyle Cleric (Cle 4 Mon Hum 5). Then by the Theatre Wagon you meet Seelah. The soldiers are starting to lose their morale at this point, if you succeed on a DC 13 Persuasion (Diplomacy) check they will rally, otherwise they don’t (which doesn’t seem to have any game effect other than you don’t get the xp for a successful check). Note that this check is made with the highest Persuasion skill of your current companions (which means probably yours). You don’t get the benefit of Seelah’s Persuasion skill until she joins your group. (And in this scenario, there is no other opportunity to use it, so, oh well.)
Continuing toward where Irabeth is located, you come across two Gargoyle Hunters and a Fiendish Gargoyle Hunter (Mon Hum 5). They are joined after the first round by a Half-Fiend Gargoyle Cleric (Cle 4 Mon Hum 5).
When you get to Irabeth she is nearly falling down from wounds and exhaustion but won’t give up. She is facing Nulkineth, a servant of Kabriri, the demon lord of Ghouls. After a bit of dialogue, you attack and Nulkineth takes to the sky with Irabeth’s body. Anevia tells you to call an emergency council right now.
You can run around camp and pick up all of the great treasure left by all of your dead soldiers now. There are a lot of potions of Cure Lt Wounds and one of the Crusaders near where Irabeth was taken has a Lesser Phylactery of Positive Channeling (If wearer has the ability to channel positive energy, the amount healed to the living, or damage done to undead is increased by 1d6). There is a Stranger standing at what used to be the exit from camp, but you can’t get close enough to hear the usual pithy saying about questions and answers.
In your tent are Wilcer Garms, Horace Gwerm, Nurah, and Anevia. You can sell your booty to Wilcer before starting the meeting if you want. In the meeting you discover that Irabeth, half your soldiers, the rest of your party members, and Queen Galfrey (if she is accompanying you in disguise) have been taken to the Lost Chapel (which is now revealed on your world map). It is a fair guess that they are now being turned into Ghouls. Oh, and Woljif has deserted. You get 320xp.
Anevia runs ahead to scout out the Lost Chapel and tells you to hurry or there won’t be anyone left. As soon as you exit the tent you and your three companions set out for the Lost Chapel, so make sure you sell what you need to sell, put stuff in your personal chest (or retrieve stuff), and sleep if need be. Your wounds will be healed when you get to the Lost Chapel, but spells and other abilities will not be restored.
Your first order of business will be to find and decide what to do with all of your party members, find Irabeth (whose location is conveniently highlighted on your map), and Queen Galfrey (if she was taken).
The Lost Chapel
All of your wounds are healed when you arrive, but spells are not restored. You gain 120xp. Your first order of business is to locate your other party members.
When you move toward Anevia, she will stop you. Nenio is with her and will join your party (if she is one of your available characters). During the dialogue, if you ask for healing items from Anevia, you will get a Wand of Cure Moderate Wounds with 25 charges. Taking the wand doesn’t seem to affect any of the survivors you rescue and send back to camp. Note that resting during this quest does not affect the outcome. You are not on a time limit.
- If you go South from the camp, you will come to a dead end. There is some minor treasure here and a Stranger who will give you the customary enigmatic statement before leaving.
- Following the path up the mountain to the North, you will be accosted by a Gargoyle Hunter and Fiendish Gargoyle Hunter. No treasure.
- A little further on, you see Ember kneeling over the body of a soldier with a wooden stake in his chest. He is breathing his last. Daeran is with them and counsels Ember to leave before the soldier turns into a Ghoul. Ember doesn’t listen and heals him anyway. When you ask them how they escaped, Ember says that the ghouls couldn’t paralyze her and she ran away; Daeran spins a dark story of escaping from a cave where the Gargoyles keep treasure by climbing up through a well. After sending the soldier back to camp to be healed you have the option of accepting Daeran, Ember, or both into your party. You get 120xp.
- Continuing up the hill you encounter two Gargoyle Hunters. They have no treasure, but the body they land next to has some loot.
- A Crusader is being attacked by a Half-Fiend Gargoyle Hunter and a Fiendish Gargoyle Hunter. The Crusader dies quickly, but he has some loot on him.
- Two Half-Fiend Gargoyle Hunters and a Fiendish Gargoyle Hunter. Another Fiendish Gargoyle Hunter joins the fight from behind your front lines.
- [Note that this number is red to make it visible, there is no other significance.] The next group is Yaker, several Hellknights, and several Crusaders fighting two Ghoul Creepers (Rog 3 Undead 2) and a Ghoul Stalker (Rog 6 Undead 2) OR three Ghouls, a Ghoul Creeper, and a Ghoul Stalker. Once the battle is over, one of the Crusaders moans about how he should have stayed home and picked mushrooms, and Yaker lets you know that Regill still lives. If you comment on the lack of fighting spirit in the Crusaders, Yaker will comment that such cowardice would merit execution in the ranks of the Hellknights. You have several options for dealing with this that affect your alignment (but don’t seem to have an immediate game effect), or you can just insist that there will be no executions in your army. Once you send Yaker and his men back down to the foot of the hill, you can continue.
- Sosiel is farther up the path. He is using his Channel Positive Energy ability to cover the retreat of several Crusaders from a group of Ghouls. A Hellknight female stops and turns to help cover the retreat, but she is killed before Sosiel can destroy the last of the undead. Distraught, he kneels over her body and tries to revive her. It turns out that she has Immaculate Petal (+1 Heavy Shield), which belonged to Sosiel’s brother. He didn’t get a chance to ask her where she got it before they were attacked and now she’s dead. Sosiel gets the shield, and he asks you to talk to Regill on his behalf to see if you can find out her history. (Side Note: Don’t sell this shield, it is necessary to have it if you wish to recruit Sosiel’s brother, Trevor, as an NPC later in the game.) This gives you the quest From a Dead Woman’s Hands. You have the option of expressing your extreme pleasure at seeing Sosiel again (flirting), taking Sosiel into your party, or sending him down the hill. You get 120xp. The well that Daeran escaped through is here, but you can’t access it at this time.
- Continuing your trek up the mountain, you come across a bunch of dead bodies. One of the soldiers is not as dead as the others, and she cries out for help. If you succeed on a DC 22 Perception check, you will notice her nodding to one of the “dead” bodies. It’s an ambush! (If you fail the Perception check, Seelah will whisper in your ear that the bodies are actually ghouls. It's an ambush!) The first thing the Ghouls do is kill the wounded warrior (which means they won't be attacking your party). There are three Ghoul Creepers and a Ghoul Huntmaster (Rng 6 Undead 2). They have standard equipment, as does the dead Crusader. If you are somehow able to save the Crusader (which requires a little bit of luck and a lot of planning) she will praise Iomedae, thank you, then stand on the path and do nothing. You can't talk to her or heal her. Kind of a letdown.
- And up you go. Four Ghoul Creepers and a Ghoul Stalker are battling some Armigers (Hellknights), Crusaders, and Regill. Once the battle is over, you hear Regill giving commands to the troops. He tells you that there are over three dozen Gargoyles and Ghouls in the Chapel and that the fires that drew the Gargoyles to your camp were set by a spy (since Gargoyles don’t use fire). You have the option of adding him to your party or sending him to the bottom of the hill. You get 120xp.
- Bodies are being dropped from the top of the mountain at this location. A DC 22 Perception check will find some mundane loot on one of the bodies. A soldier is still alive under some rubble, complaining that it hurts (he’s in a pile of rusty blades). A DC 23 Mobility check will free the soldier, and he goes to the bottom of the hill. Failing the check causes 2d6+2 damage to the character that tried to free him. You can try as many times as you want to.
- A Half-Fiend Gargoyle Hunter joined by a Fiendish Gargoyle Hunter. No treasure.
- At the top of the hill, you see a Cleric Crusader being taunted by three former Crusaders, now Ghouls, who want him to renounce Iomedae and join them. The Crusader destroys the Ghouls by channelling positive energy, then calmly walks to the bottom of the hill.
- Four Ghouls (Undead 2), a Succubus (Outsider 8), and a Kabriri Cultist (Cle 9) are here. They will not join the fight if you go through the gate (area 15) before dispatching them, nor will the ghouls at the gate join if you fight this group first. Only the Cultist has any treasure (a few scrolls and mundane equipment). At the Southeast end of this area, a DC 25 Perception check will reveal a stash with an Apprentice Lockpick in it.
- At the entrance to the Chapel, you face a Kabriri Cultist (Cle 11), two Ghouls, and a Ghoul Stalker. After the first round, another Ghoul, a Ghoul Creeper, and a Ghoul Huntmaster join. In the 3rd round, two more Ghouls and another Ghoul Stalker rise up and join. Killing the Cultist in the first round does not prevent these undead from rising. The Cultist has some scrolls. One of the Ghoul Stalkers has Honorable Judgement (+2 Axiomatic Gnome Hooked Hammer; if the wielder has any Lawful alignment, the first hit they land in a round against a creature with any Chaotic alignment will do an additional 1d6 Holy damage). A skeleton on the West side of the courtyard has some minor treasure. On the East wall are some runes that spell “Welcome to the Slaughterhouse.”
- Inside the Chapel you see that Vissaliy Rathimus has been transformed into a Ghoul. He is lecturing five kneeling Crusaders on how hopeless their fight is. One of them speaks defiantly, and Rathimus strikes her down. One of them freaks out and says she’ll renounce her goddess. You have the option of a Lawful action which requires the Aeon Mythic path, a Good or Chaotic action which requires a DC 25 Diplomacy check, a Lawful action which requires a DC 25 Intimidate check, or you can just tell Rathimus to knock it off.
- If you have followed the Aeon Mythic Path, you have the option of condemning the Crusader that renounced her goddess. This causes the Crusader that was hit to rise to his feet and strike her down. If Queen Galfrey has joined your army, she will chastise you for condemning your allies instead of killing your enemies. A new event will be added in Part IV "Military Tribunal". Three Crusaders will join your fight. Queen Galfrey chastises you again after the fight.
- Succeeding on the Diplomacy check for whichever alignment causes one of the Crusaders to release a Positive Energy burst, and three of the Crusaders join your fight.
- Succeeding on the Intimidate check causes three Crusaders to join your fight.
- Failing on any check or telling Rathimus to knock it off means only one Crusader will fight with you.
- If Queen Galfrey was taken, she appears and kills a couple of ghouls before the battle begins and will help you through the battle. When the battle is over, you will get 120xp for finding her.
- If you have the Wand of Zacharias, a set of stairs leading down will be revealed on the East wall. That is covered below under the heading: Downstairs to Zacharias.
- Through the door to the West, you are outside in the snow. A DC 18 Knowledge (World) check is shown here, but you have to be on the other side of the wall to do it.
- Continuing North, you come to a room with three Ghoul surgeons (two Ghoul Creepers and a Ghoul Huntmaster) adding body parts to Crusaders before their transformation into Ghouls. You can do a DC 22 Stealth check here to sneak up on the Ghouls and attack them (this lets you move any of your party members to any position before starting the attack). If you fail or choose not to, they will kill the two Crusaders they are working on before engaging you in battle. If you succeed, any Ghoul you are not directly engaging will attempt to kill the Crusader on his table. There is a trap in the room in front of the door on the East side, so be careful around that area. There is only mundane treasure.
- Going East, you find Irabeth hanging from a hook praying to Iomedae. She is nearly dead. Another soldier in the room tells Irabeth that he doesn’t want to die. She convinces him to pray with her. Then the soldier turns, although he still has Paladin levels (Pal 2) (which is a bit of a bug since Paladins aren’t supposed to be able to turn). Once the Crusader is dead, Seelah helps Irabeth down. Irabeth warns you that Staunton Vhane is here, and this is a trap. She can make it on her own down the mountain. The Crusader has mundane treasure and a couple of potions of Cure Lt Wounds. There is only mundane treasure in the room, but there is a disarm point for a trap here. The trap itself is on the other side of the door (it's a Phantasmal Killer trap), but you can disarm it before going through.
- On the other side of the door, you see Nulkineth playing soldier with his new contingent of ghouls and four crusaders that haven’t been turned. Minagho and Staunton are on the tower overlooking the courtyard. Staunton seems unhappy about how the Crusaders are being treated; he just wanted them dead, not tortured. Minagho doesn’t believe they’re suffering enough. Nulkineth gets a little pouty about you paying attention to Minagho and Staunton instead of him. You now have three (or four) dialogue options. Only the option to call on your deity will affect the battle, which will only be available if you are a worshipper of some deities. I haven’t tested all of them to see which ones offer bonuses, but I know Pharasma will help you and Abilar and Calistra won’t. (Pharasma gives a +4 morale bonus to Attack, Saves, and Skill Checks for one hour.) Whichever option you choose, the four Crusaders that haven’t been turned will fight by your side. If you had the Wand of Zacharias and you accepted his offer of help from the dead, seven more crusaders will rise and fight for you.
Your enemies are Nulkineth (Inquisitor 5 Outsider 9), Ghoul Huntmaster (Rng 6 Undead 2), Ghoul Creeper (Rog 3 Undead 2), and two Ghoul Stalkers (Rog 6 Undead 2).
Once you have wounded Nulkineth sufficiently, something rises in you and demands to be brought forth. The choice you make here may affect the Mythic Path you will choose later since you get your second Mythic Level when you finish this battle. You get 1680xp.
After the battle is over, you get 320xp, your second Mythic level, and there are several mundane loot stashes around. Nulkineth has +1 Breastplate, Belt of Mighty Constitution +2, Cloak of Resistance +2, and Flail of False Hope (+2 Mithral Flail; on a confirmed critical, the wielder is healed of 1d6hp; can only be wielded by CE, CN, and NE characters).
- This is a graveyard. A DC 18 Knowledge (World) check will reveal that one of the gravestones is written in Titan. A locked chest on the West side contains some mundane treasure. Also on the West side is a trail leading down the mountain. Three mundane loot stashes can be retrieved on the trail.
- The trail ends in a spot where you can do a DC 20 Athletics check to climb down the side of the mountain. Success gives you xp. Failure causes damage to everyone in the party.
- From this level, you can do a DC 21 Athletics check to get to the next lower level. Again, failure is damage; success is xp.
- A Fiendish Gargoyle Hunter (Mon Hum 5) and a Half Fiend Gargoyle Chieftain (Cle 8 Mon Hum 5) are here. They are standing over some bodies with mundane treasure and Blaze of Disaster (+1 Flaming Quarterstaff; 3 times per day, the wielder can cast Fireball as an 8th level wizard). The Chieftain has an Amulet of Mighty Fists +2 and a Cloak of Resistance +1.
- Heading East, you fight a Ghoul Creeper and Ghoul Stalker. They have mundane treasure.
- A little bit East at the South end of the map, you come to some mundane treasure.
- Here you can ascend the mountain with a DC 21 Athletics check. Failure means damage and you don’t ascend; success means xp.
- There is some minor treasure on this shelf.
- A DC 22 Athletics check to go up. Failure means damage and you don’t ascend; success means xp.
- A Fiendish Gargoyle Hunter and a Gargoyle Hunter land to do battle. They have no treasure. There is a DC 18 Athletics check to go back down at the same place you came up. Moving further on the trail, you will find a DC 21 Athletics check to ascend to the road in front of the Lost Chapel (close to area 12). If you continue past the Athletics check, you will meet a Fiendish Gargoyle Hunter and a Gargoyle Hunter with no treasure. There is a body there with some minor treasure.
- A DC 18 Athletics check here will take you down to area 37. There is a narrow shelf to the North with some minor treasure at the end. While moving along the narrow shelf, you might see the Succubi in area 38. Your archers and spell casters can kill them from here without endangering the party.
- In this area are two Fiendish Gargoyle Hunters and two Half-Fiend Gargoyle Hunters. No treasure.
- Moving North from there, a DC 22 Perception check will reveal a skeleton with some mundane treasure and Warhammer of Obstinacy (+2 Warhammer; on a hit the target must make a DC 15 Reflex save or take an additional 1d8 Piercing damage). Next to that is Desna’s alter. If you interact with it (you have to have kept the Azata Mythic Path available), you will hear a musical tone. Interacting with it again will give you the Map of Unknown Lands (which has Desna’s symbol on it). If you have the Small Sextant from area 38 and the Small Harp from the cave, area 3, place these two items on the shrine, and you will have three hand symbols to interact with now. If you press them in the following order: Middle, Right, Left, Middle, you will see a female succubus who tells you she is awaiting execution in the prison below Drezen. This is Arueshalae, a potential party member. After the vision clears, you can retrieve the items of Desna and the Thowing Axe of Silence (+3 Throwing Axe, on a hit, the target must make a DC 14 Fortitude save or be unable to cast spells for 1d4 rounds).
- Continuing East, you come to two Ghouls, five Ghoul Creepers, and a Ghoul Huntmaster. Mundane treasure.
- A Kabriri Cultist (Cle 9) accompanied by two Ghoul Creepers and a Ghoul Stalker. They have mundane treasure. A DC 22 Perception check in this area will reveal another stash of mundane treasure and to the South is a stash of loot.
- At the end of a narrow area, you will find a Half-Fiend Gargoyle Hunter and a Fiendish Gargoyle Hunter. There are a few mundane treasure stashes here, but the Gargoyles have nothing. If you move next to the cliff in this area, you can make a DC 18 Athletics check to climb up to a shelf here. Failure means everyone takes damage, and you don’t make it to the top. Success gets you xp, and you’re up to area 32.
- East of that fight are two Succubi standing over a body with some mundane items and a Small Sextant. This Sextant has the symbol of Desna on it. If you can interact with the alter in area 34, this is one of the two items you need to get a vision of Arueshalae.
- North along the edge of the map, you will find a Succubus (Outsider 8) and three Incubus (Outsider 8). Nearby is a Stringy Demondand (Outsider 20). He will join the fight if you move too far North. If possible, you want to kill the demons before taking on the demondand. The demons have standard equipment. The demondand has nothing.
- There are a couple of mundane loot stashes here, and a body that has a Viscious Handaxe +2 (Viscious means that on every hit, the target will take 2d6 extra energy damage, and the wielder takes 1d6 energy damage).
- Further North, you will see two Ghoul Stalkers — mundane treasure.
- West are three Ghouls Creepers and a Ghouls Stalker — mundane treasure.
- Next to a broken cart, you will find a Maugla (Rng 3 Outsider 9). This fight is not as easy as you would think because this creature uses death gazes that drain levels. It has Bracers of AC +4 and Big Game Gloves (whenever the wearer announces a quarry, the target takes a -2 to AC and becomes sickened for three rounds). There is some mundane treasure nearby.
- The path ends at a cave entrance into the mountain.
You face a Transformed Rathimus (Cle 7 Undead 2), two Ghoul Creepers, three Ghoul Stalkers, a Ghoul Hunter, and a Crusader (Pal 4). There is a trap in front of the alter. It is between you and the Ghoul Huntmaster, so it might be a good idea to disarm it during combat. The Ghouls have standard stuff, the dead Crusaders have potions of Cure Lt Wounds, and Rathimus has a Shield of Magical Retribution (+2 Light Shield; any time the wielder is hit with a touch attack, whether melee or ranged, the enemy takes 2d6 Force damage) and an Amulet of Agile Fists +2 (if the wearer has Weapon Finesse, they can add Dex modifier to damage instead of Str modifier for any unarmed or natural attacks; additionally, the amulet confers a +2 bonus to attacks and damage with unarmed or natural attacks). There is a locked chest on the East wall with mundane treasure. The survivors go to the bottom of the hill, along with Queen Galfrey if she is present.
There is a magic circle in the center of the room. A DC 18 Knowledge (Arcana) check will reveal that it is a ritual circle drawn with the unholy symbols of the lords of the Abyss. Inspecting the alter shows that it still radiates Holy power and hasn’t been desecrated. Interacting with the alter twice results in a reduction in Abyssal corruption for the party.
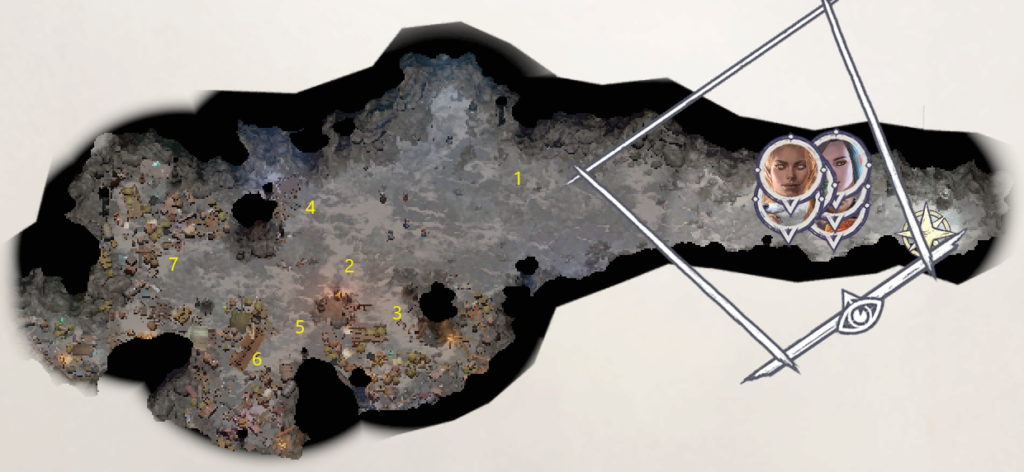
The Cave
Tip: There is only one room, but it is a big one, so you can avoid fighting all of the Gargoyles at once if you don’t run forward too quickly.
- A Gargoyle Hunter and a Fiendish Gargoyle Hunter.
- A Gargoyle Hunter and a Fiendish Gargoyle Hunter.
- Small Harp (it has the symbol of Desna on it).
- There are two decapitated Gargoyles next to some ladders and other junk. (Remember Daeran saying he escaped from a cave up through a well?) If you examine the bodies, you will see that they were dead before someone beheaded them. If you click the interactive hand, you will open up an exit from the cave that comes out at the well you passed on your way up (area 8). You can now use this well to get out and back into the cave.
- Bruiser’s Chainshirt (+2 Chainshirt; DR 5/piercing).
- Book of Dreams, 2nd page (as you collect more of the book, you will gain more abilities. Having this page means that every creature you summon will have the effects of Greater Longstrider and Good Hope).
- Two Half-Fiend Gargoyle Hunters.
Back at Camp: When you arrive, Sosiel and Regill are talking about the shield that Sosiel found on the Hellknight. Regill says that her name was Marenta, and she transferred from the Order of the Nail – Extirpators Chapter. She had the shield with her when she arrived. Sosiel will need to find them and ask. This is part of the quest From a Dead Woman’s Hand. When you find Anevia and talk to her, she notes that you have changed again (new Mythic level). She proclaims another miracle and tells you she is getting everyone back to camp to get some good rest after their ordeal. Queen Galfrey (if she is with you) proclaims that you were the right choice for the position of Commander. You get a new companion quest: Crescent of the Abyss. (Woljif ran when the Gargoyles attacked, but you’re sure he’ll be back when he gets into trouble. All you can do now is wait.) This moves you along the quest Banner Over the Citadel and ends the quest A Strike From the Sky.
A new location may become available on the world map: Ruins of Ashberry Hamlet. This location only seems to appear if you rescued the Firemages from the Blackwing Library in Kenabres.
When you get back to the Crusader’s Camp and talk to Wilcer Garms, he is troubled by how worried the soldiers are before the big battle, and he asks for your advice. A rousing song or good night’s rest has no game effect. Holding a tournament will give you a unit of six Rangers and eight Champions.
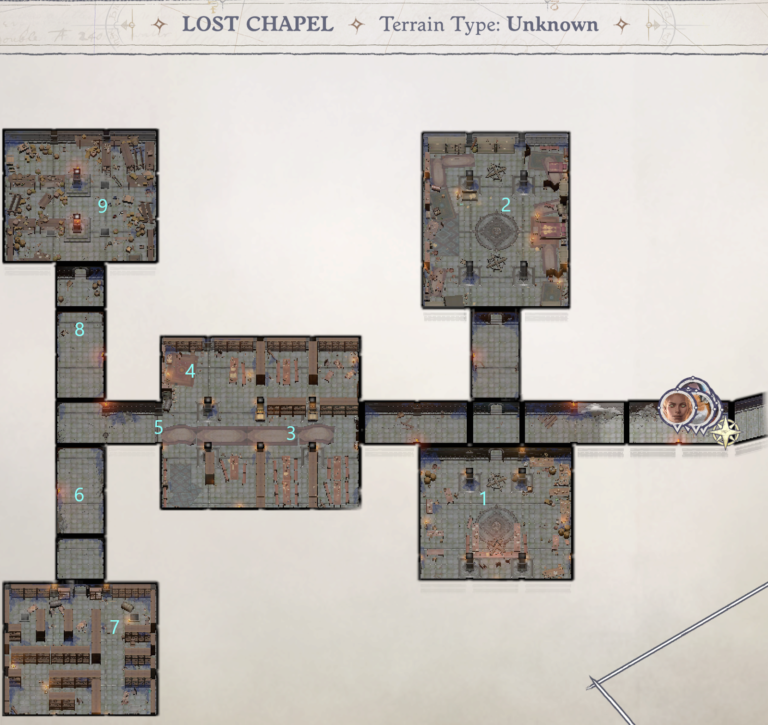
Downstairs to Zacharias
You are faced with a long hallway heading West.
- There is some minor loot in this room.
- There is a trap in front of the door. Inside is a Stone Golem (Construct 14) and five chests with some minor loot scattered about. A DC 24 Perception check against the East wall will reveal more minor loot. A bookcase at the back of the room holds Zacharias “Toward Eternity” (+1 Competence bonus to DC of spells with the Death descriptor).
- Continuing West, you will come to a library where you can loot several books along the South wall. History of the Worldwound (it says it gives a +1 Insight bonus to Lore (Religion) and Lore (Nature) checks, but my characters only seem to get the bonus to Religion, probably a bug), Crusade Chronicles (+10 hp), and Know Thy Enemy (A Crusader’s Brief) (it says it gives a +1 Insight bonus to Perception and Stealth checks, but my characters only get the Stealth bonus, probably a bug).
- This is Zacharias, a 14th level Sorcerer Lich. Zacharias wants his wand back. In conversation with him, you find that he made an oath not to leave this place until a worthy crusader brought his wand back to him and asked for help. Anything short of giving him his wand (which puts you on the path to become a lich), refusing to give him his wand, or attacking him keeps the conversation going. If you attack him you will find that he is a formidable opponent so prepare well. He has Dried Hand of the Martyr (one time only casts Death Ward at caster level 9), Headband of Alluring Charisma +2, Amulet of Natural Armor +1, Ring of Protection +1, Cloak of Resistance +1, and the Broken Wand of Zacharius. There is some mundane treasure here and an Imp familiar (when activated, gives a +2 profane bonus to Trickery and Stealth checks).
If you accept the proposition and give Zacharias the wand, he accepts you as his apprentice and begins the process of transforming your soul to be ready for the transformation. Your first duty as an apprentice is to command the undead Zacharias will activate during the battle with Nulkineth. (If you choose not to have the help of the undead, Zacharias is disappointed, but it doesn’t seem to stop you from becoming a Lich).
- A DC 20 Perception check will reveal a secret door in the library’s West wall center. A few feet into the hall, you will discover a trap with the disarm point back in the library on the South wall.
- Two more traps.
- The library annex. There are several mundane books and general loot in this room. There is also a Spectre (Undead 8) and a Stone Golem (Construct 14) on guard. In the far Southeast corner, you will find a chest with a Lesser Maximize Metamagic Rod. On top of a bookshelf in the Southwest corner, you will find Duality of Conjuration and Summoning (Once per day the wielder can use this book to summon creatures; if good-aligned, it will summon 1d2+1 Nabasu Demons, if evil-aligned, it will summon 1d2+1 Monadic Devas, if neutral aligned it is a 50% chance for either. The book has ten pages, and when used, one of the following scrolls will appear in the user’s possession determined randomly:
- Angelic Resistance – +2 racial bonus to save vs. poison for 1 hour
- Demonic Resistance – +5 electricity resistance for 1 hour
- Abyssal Regeneration – +5 fast healing for 1 hour
- Angelic Knowledge – +2 bonus to all Knowledge and Lore checks for 1 hour
- Demonic Intimidation – +2 bonus to Intimidation checks for 1 hour
- Wings of Freedom – +2 on saves against ground effects for 1 hour
- Divination – All spells cast from Divination school are cast as if you were 1 level higher for 1 hour
- Stomp – +2 bonus on CMB checks for 1 hour
- Resourceful Smite – Gain an additional Smite Evil per day permanently. Can only be applied once per creature.
- Resourceful Rage – Gain an additional Rage per day permanently. Can only be applied once per creature.)
- This nasty trap must be maneuvered through very carefully to get to the disarm point. If you fail, you will set off a 7th level Lightning Bolt. The Trickery DC is only 9, so the problem is getting to the disarm point, not the actual disarm.
- Inside the room are two Spectres (Undead 8) and some mundane treasure.
From a Dead Woman’s Hands
Sosiel talks to Regill when the Strike From the Sky quest is over and discovers that the woman recently transferred to Regill’s company. He does not know where she got the shield. When you get back to the main camp, you need to talk to Sosiel.
During the conversation with Sosiel, you can push him in the direction of admitting that his brother has changed and that he might have been dismissed from the ranks of Paladins of Shelyn. Taking this conversational path is necessary if you want to have a chance to recruit Trevor later in the game. You get 400xp when you talk to Sosiel, and the quest is completed.
Attack on Drezen
Once the demon fortress just South of Drezen is taken, a couple of things happen. One is that three more demon armies are revealed to the West of Drezen (a little more target practice for your generals). The other is that you are immediately taken into a conference to discuss strategy the next time you return to camp.
Anevia gives the initial briefing. If you have convinced Queen Galfrey to fight with you, she will enter and tell you not to pay any attention to her. Then you can talk to Irabeth (“What are the Eagle Watch going to do?”), Regill, Nurah, the Queen (if she is present), or ask Amelia about the Vescavor Slime (if you got it from the Vescavor Queen).
- Regardless of who you talk to first, Irabeth loses it. “We’re all going to die!” seems to be her contribution. You have three options, but regardless of which one you choose, she maintains the attitude that this is hopeless. You are now given four choices (seven if Queen Galfrey is with you and you have maintained the Angel Mythic Path). Good (suspend Irabeth), Lawful (order Irabeth to do her duty), Evil (arrest Irabeth), or Evil (succumb to your inner demon). Regill adds his two cents about how the weakness of the Crusaders is why they’ve never been successful before now.
- Suspending Irabeth means she leaves the tent and won’t be with you in the battle for Drezen.
- Ordering Irabeth to do her duty means she will participate in the assault on the front gates.
- Arresting Irabeth means she leaves the tent and won’t be with you in the battle for Drezen.
- Succumbing to your inner demon has you punching Irabeth in the face. This seems to snap her out of her lethargy. You get some xp, and Irabeth pulls herself together. She will lead the assault on the front gates. This action drops the soldiers’ morale by 15 points.
You get three additional options if Queen Galfrey is with you and you have maintained the Angel Mythic Path. (You have to succeed on a Diplomacy check for one of them, but the other two are automatic.) Whichever of these options you choose, Irabeth rallies and you get xp.
If you ask again what the Eagle Watch will do, Anevia tells you that each unit will have a couple of Eagle Watch soldiers so that the most experienced demon fighters can be there to help the newer recruits.
- If Queen Galfrey is with you, she says that she will be fighting with the army, as she has been told that her presence boosts morale, i.e., she is going in the front gate with the main invasion force.
- When you talk to Regill he lets you know that his scouts have discovered giants near the Temple Ruins that have catapults for throwing Alchemist’s Fire and worse things at your army. He suggests you enter through the broken wall by the temple ruins, sneak up on them, and dispatch them before they can do serious damage to your army. He would like you and your companions to join him and his troops for this mission in case there are any surprises. Anevia objects saying that the troops won’t like it. Regill counters with an acerbic comment about the sorry state of discipline in the Crusader ranks. This option gives you Hellknights following you through the city and not just Crusaders.
- When you talk to Nurah, she suggests using a secret passage through the dungeons of Drezen. The plan would be for your party to enter and attack the demon army from underneath. She suggests that the Sword of Valor might even be in the dungeons, and if so, you might be able to recover it and end the battle before the demons even know they’ve been attacked! Spoiler: This is a trap. When you enter the Dungeon Prison, every inhabitant will be gathered in the first room to fight you. It saves time since you don’t have to take them out one by one, but there are a lot of enemies to take on at once. Starting your assault from here does let you rescue Arueshalae early on, so you can have her in your party from the beginning. Note that you have to have met the prerequisites at the Lost Chapel for her to join you (she is a Succubus Ranger specializing in ranged attacks and cannot be killed).
- Asking about the Vescavor Slime (if you have it) brings another objection from Anevia about how cruel it is to send soldiers to be eaten by demon bugs. Still, she concedes that the strategy would likely wipe out an entire demon army in one fell swoop. You can acquiesce to her objection and decide not to use the slime or choose the Evil action of using the slime. This lowers the army’s morale by 10. Note that if Queen Galfrey is with you, she will not allow you to use the slime. Period.
If Wenduag is with you, she takes this opportunity to let you know that she is looking forward to this opportunity to be with you for this battle. It’s kinda creepy, kinda threatening, and perfectly in character for someone who eventually wants to be the power and not the minion.
After you end the conference, you have to decide which strategy you will use; frontal assault, take out the giants, or sneak through the dungeon. Once you decide on your strategy, you get 1280xp. You can now leave the tent and take care of any business you may have in camp. Irabeth and Anevia are nowhere in camp. If you go into Nurah’s tent, a DC 20 Perception check will reveal a vial of a Strange Perfume. The description of the scent of this perfume sounds suspiciously like Vescavor Slime.
- Lead the Charge (enter through the front gate) – This decision increases the army’s morale by 15 points (max 20 morale). Your party will appear on the Bridge (area 1) once the gates are down.
- Accompany the Hellknights attacking the Giants – This decision lowers the army’s morale by 10. Your party will appear on a ledge outside the city (area 10). You can make your way through areas 9, 8, 11, and 12, where you can enter the Temple Ruin. Once you’ve gotten through the temple, you will exit at area 13 where you can go to area 14 and up the stairs to the city wall. You can make your way along the wall and kill the Ash Giants bombarding the city. Hellknights will accompany you the entire way even if you choose not to take out the giants first. Areas 8, 9, 11, and 12 will have different opponents if you are with the Hellknights. The other areas of Drezen remain the same.
- Go through the dungeons – This decision lowers the army’s morale by 10. Your party will appear at the entrance to the Drezen Prison. Nurah is there to greet you. When you move toward her, she reveals her true intentions, and you are ambushed by a Prophet of Baphomet (Minotaur, Cle 12 Mon Hum 6) and two invisible Babau (Outsider 7). Nurah turns invisible and runs away. After the first round of combat, a Half-Fiend Furious Minotaur (Bar 4 Mon Hum 6) and Cultist Sniper (Slayer 7) enter the fray. They all have standard equipment. See Drezen Prison for more details. Once you’ve made your way through here, you will come out in area 23 behind the gates.
When you exit the area to start the attack, you see a cutscene where the Eagle’s Watch kills several demons guarding the gate. Then several soldiers use a battering ram to break it down. If you ordered Irabeth to do her duty, she loses it before the gate is smashed. The soldiers encourage her, but she breaks down again. If you succumbed to the demon and brought Irabeth to her senses or were able to choose one of the three options that Queen Galfrey’s presence gave you, she gives a rousing speech to the troops before the gate is brought down.
If you chose to use the Vescavor, you see a cutscene with two soldiers taking the slime into the city and releasing it. They die.
Note that army morale doesn’t seem to affect the taking of Drezen (although it does change the soldiers’ dialogue during the battles). It will affect you later when your armies are on the move again, but the taking of Drezen is entirely dependent on what your party does.
Note that using the Vescavor Slime will result in at least one Vescavor nest being present in Drezen after you take it. You will have to eliminate the Vescavor from the city later, or they will cause major problems.
Strategy: Until you kill the Ash giants on the walls, you will be pelted with flaming debris, disease-filled nasty things, and rocks. Getting to the giants and stopping the barrage early will save you a lot of trouble. If you chose to enter through the front gate, it might serve you well to head West immediately and enter the Temple to get to the wall.
As you take out key locations, temporary camps will be set up. These camps give you a chance to rest and refresh spells. They will not remove the Death’s Door condition, but you will be able to heal.
The enemies you will face are determined by which strategy(s) you chose: Standard (which includes going through the front gate and entering through the Prison), Accompanied by Hellknights, Released Vescavor. If there is more than one possibility at a location, each will be labeled.
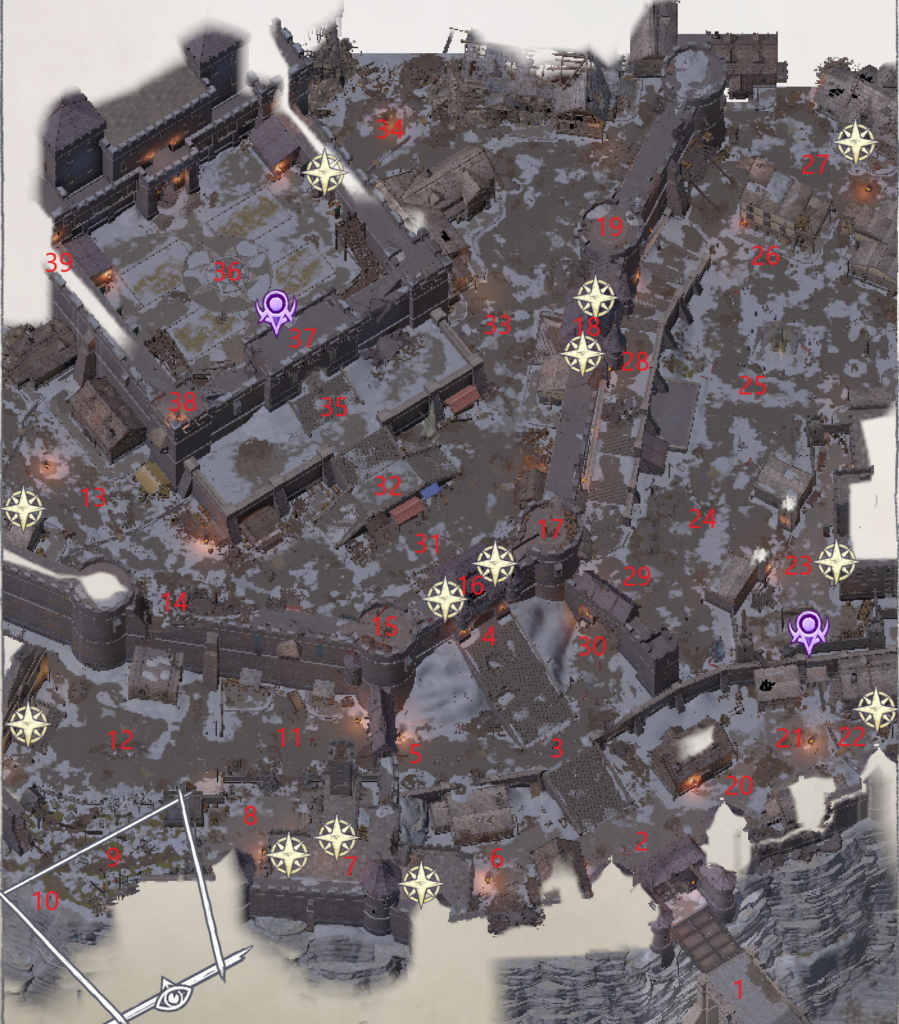
- The Bridge – there are several Schir corpses here that have standard equipment.
- Standard: Through the gate, you find your soldiers fighting two Babau (Outsider 7). They have standard equipment. There is a loot stash to the West.Released Vescavor: Through the gate, you find three Vescavor Swarms (Outsider 5) and two dead Babau. The Babau have standard equipment that can be looted, and there is a loot stash to the West.
- Standard: At the top of the first set of stairs you find a Brimorak (Outsider 6), Cultist Sniper (Slayer 7), and four Dretch (Outsider 2). They have standard equipment.
- At the top of the second set of stairs you will find two Babau (Outsider 7) and a Nabasu’s Votary (Rng 12). Once the battle begins, two invisible Babau will reveal themselves and join in the attack. The Nabasu’s Votary has Adamantine Chainmail; the rest of the equipment is standard. You cannot open this gate until you stop the catapult fire from the giants. If you kill the Ash Giants in areas 15 and 17 but choose not to pull the lever in area 18, you can call the troops to break down the gate. While the Crusaders pound away at the gate, you will have three waves of demons to defeat:
- Two Vrock (Outsider 9) and two Babua (Outsider 7)
- Two Dretch (Outsider 2) and four Schir (Outsider 5)
- Two Vrock (Outsider 9)
- A Shadow Demon’s Votary (Wiz 13) is here guarding a side gate. This side gate will let you get past the walls. (There is a handle in area 11 that will let you open the door, but breaking this door down is one way to get to the giants if you came in the front gate.) You will have to contend with four waves of demon defenders while the soldiers are working:
- Wave one is a Vrock (Outsider 9)
- Wave two is three Babau (Outsider 7)
- Wave three is two Dretch (Outsider 2) and four Schir (Outsider 5)
- Wave four is another Vrock (Outsider 9).
- Here you can do a DC 23 Athletics check to get on the roof of the building to the North and bypass the first set of stairs. From the roof you can make a DC 22 Mobility check to get down or a DC 26 Mobility check to get to the lower roof of the Barracks (jumping across). (See the Barracks for more information on that area.) You will find a body with some minor loot to the West. Moving South will reveal an invisible Shadow Demon Votary (Wiz 13) with standard equipment.
- The roof of the Barracks adjoins the South end of the wall. There is no access to the rest of the wall from here, but there is a loot stash. See the Barracks for more information.
- Standard: The barracks courtyard is inhabited by two Babau (Outsider 7), two Schir (Outsider 5), and a Nabasu. They have standard equipment. In the courtyard are three loot stashes with mundane items and a set of Crusader Supplies so you can rest.
- Standard: this cemetery is inhabited by two Babau (Outsider 7), a Schir (Outsider 5), and a Dretch (Outsider 2). Standard equipment. A DC 18 Perception check at the North end of the cemetery will reveal that one of the graves has treasure: the Graveyard Keeper’s Helmet (+2 bonus to AC vs. Undead). A DC 18 Perception check will reveal a grave with a couple of scrolls and some mundane treasure to the South. A DC 25 Knowledge (World) check on another of the graves will reveal the epitaph of the body and give you some xp.
Accompanied by Hellknights: all of the opponents are dead. Barriers have been set up to protect archers stationed in the cemetery. There are two stashes of Crusader Supplies (so you can rest) in the SE corner of the cemetery. A DC 18 Perception check at the North end of the cemetery will reveal that one of the graves has treasure: the Graveyard Keeper’s Helmet (+2 bonus to AC vs. Undead). A DC 18 Perception check will reveal a grave with a couple of scrolls and some mundane treasure to the South. A DC 25 Knowledge (World) check on another of the graves will reveal the epitaph of the body and give you some xp.
- This is the ledge you start on if you accompany the Hellknights to take out the Ash Giants.
- Standard: Four Babau (Outsider 7) and a Kalavakus (Outsider 10). They have standard equipment. If you didn’t break the gate to the East down, there is a handle here that can be used to open it. The gate leads to area 5. If areas 2, 3, 4, 5, 8, and 11 have been cleared, a temporary camp will be set up at this location once the gate is open.
Accompanied by Hellknights: a Babua Warrior (Outsider 9) and Schir (Outsider 5) are battling two Hellknights. Four Babua (Outsider 7) and a Kalavakus (Outsider 10) enter the fight in the second round. They have standard equipment. If you didn’t break the gate to the East down, there is a handle here that can be used to open it. The gate leads to area 5. If areas 2, 3, 4, 5, and 11 have been cleared, a temporary camp will be set up at this location once the gate is open.
- Standard: A Fiendish Minotaur Assaulter (Slayer 6 Mon Hum 6), Cultist Slayer (Slayer 7), Cultist Archer (Fig 7), Cultist Evoker (Wiz 9), and two Deskari Cultists (Cle 1 Fig 6) guard the entrance to the Temple Ruins. There are several scrolls on the bodies, and the Fiendish Minotaur Assaulter has a +1 Handaxe. On the Northside of the building is a locked loot stash with mundane items and 2157 gold. Next to the city wall is a building where you can do a DC 25 Athletics check to get to the roof. On the roof is a body with an Axiomatic Quarterstaff +1 (+1 Quarterstaff; Axiomatic does +2d6 damage against Chaotic creatures). You can do another DC 25 Athletics check from here that will bring you to area 14, the stairway to the city wall.
Accompanied by Hellknights: A Fiendish Minotaur Assaulter (Slayer 6 Mon Hum 6), Cultist Slayer (Slayer 7), two Cultist Archers (Fig 7), two Cultist Evokers (Wiz 9), and two Deskari Cultists (Cle 1 Fig 6) guard the entrance to the Temple Ruins. There are several scrolls on the bodies, and the Fiendish Minotaur Assaulter has a +1 Handaxe. On the Northside of the building is a locked loot stash with mundane items and 2157 gold. Next to the city wall is a building where you can do a DC 25 Athletics check to get to the roof. On the roof is a body with an Axiomatic Quarterstaff +1 (+1 Quarterstaff; Axiomatic does +2d6 damage against Chaotic creatures). You can do another DC 25 Athletics check from here that will bring you to area 14, the stairway to the city wall.
- This is one of the entrances into the Temple Ruins. Two Derakni (Outsider 11) are here. They have no treasure, but a loot stash on the East side of the building contains mundane treasure.
- This is the collapsed but still navigable stairway leading up to the city walls where the Ash Giants wield their catapults. At the top of this staircase are four Cultist Archers (Fig 5) and a Vrock (Outsider 9). They have standard equipment. Two minor loot stashes are North of this location. From this location, you can do a DC 21 Mobility check to get down to the roof of the building near area 12, then a DC 22 Mobility check to get to ground level.
- There is an Ash Giant (Humanoid 14) on this Tower. He has standard equipment. A loot stash here has some mundane ingredients. On the West side of the Tower are two more Cultist Archers (Fig 5) and the entrance to the passageway beneath the gate.
- When you first enter the hallway, there are two loot stashes. One is out in the open, and the other is in a chest with a difficult lock. Both stashes contain mundane items. Just past these stashes is a nasty little trap that covers most of the floor. To disarm it, you will need to maneuver the character as close to the South wall as possible, then edge up to the trap. When you are almost touching it, click on the disarm point. The character will walk the edge of the trap and disarm it. A handle on the wall will open the gate at area 4. You get 960xp for pulling the handle and don’t have to fight the waves of demons that will defend the gate. There are two more loot stashes at the East that contain mundane treasure.
- Standard: There is a Cultist Archer (Fig 5) and Ash Giant (Humanoid 14) here. They have standard equipment. If you pulled the lever to open the gate, then when you kill the Ash Giant, you will see a cutscene with Queen Galfrey and Irabeth (If they are with you in the battle) exhorting the troops that things are looking up, but they still have to stay on guard. They will now set up a temporary camp just on the other side of the gate. Wilcer Garms may join them, giving you a place to sell your loot that isn’t as far away. On the other side of the Tower are two Cultist Archers (Fig 5) with standard equipment. At the end of this wall section, you can do a DC 22 Mobility check to get down to ground level between areas 31 and 33 or enter the door that takes you beneath the next gate. You can do a DC 23 Athletics check from the area below the Tower to get up to this level.
Released Vescavor: There are two Cultist Archers (Fig 5) here. On the Tower itself is a dead Ash Giant and three Vescavor Swarms (Outsider 5). If you pulled the lever to open the gate, when the battle is over you will see a cutscene with Queen Galfrey and Irabeth (If they are with you in the battle) exhorting the troops that things are looking up, but they still have to stay on guard. They will now set up a temporary camp just on the other side of the gate. Wilcer Garms may join them, giving you a place to sell your loot that isn’t as far away. On the other side of the Tower are two Cultist Archers (Fig 5) with standard equipment. At the end of this wall section, you can do a DC 22 Mobility check to get down to ground level between areas 31 and 33 or enter the door that takes you beneath the next gate. You can do a DC 23 Athletics check from the area below the Tower to get up to this level.
- This hallway is friendlier than the last. There is no trap, and there are two loot stashes here. If you haven’t already broken the gate down at area 28, there is a handle here that will open it. You get 960xp for pulling the handle.
- Below the first Tower is a Cultist Archer (Fig 5). On the Tower are two Cultist Archers. On the other side are two Cultist Archers that will be joined by two Vrock (Outsider 9) as soon as battle is joined. On the second Tower are two Cultist Archers. They all have standard equipment. In a chest on the second Tower is a +1 Holy Light Crossbow (Holy does an extra 2d6 damage against Evil creatures). You can do a DC 22 Mobility check from this location to get down to a platform South of the wall. On the platform is a crate with some mundane treasure. You can do a DC 21 Mobility check from that platform to get to ground level North of area 28 or a DC 25 Athletics check to get back up to the top of the wall. Note that once you go down to ground level, you can't climb back up, but will need to go all the way around to get back here.
- You will find Irabeth, Queen Galfrey, and Wilcer Garms in this area. Wilcer will let you buy and sell items and offer you a place to rest and restore spells. You can only rest here twice before the supplies are used up. Irabeth and Queen Galfrey have nothing to offer at this time. A DC 19 Perception check will reveal a loot stash on one of the crumbled walls just South of Wilcer. It contains a Potion of Blur, a Potion of Barkskin, and a Wand of Fireballs with 6 charges. This may be one of the loot stashes that Crinukh the kobold told you about.
- Standard: Several Crusaders are fighting a Schir’s Votary (Fig 9) and two Schir (Outsider 5) here. They have standard equipment.Released Vescavor: There are two Vescavor Swarms (Outsider 5) here and a couple of dead Crusaders that can be looted. On the roof to the North is another Vescavor Swarm (Outsider 5).
- Here the Crusaders are fighting two Babau (Outsider 7). They have standard equipment. A crate to the South and the cart just before the entrance to the ruins both have mundane loot. The entrance to the Ruins is here. There is a chest with mundane treasure on the West side of the building. From here, you can do a DC 26 Athletics check to get up to area 23.
- This is another entrance to Drezen Prison. Several Crusaders are battling a Cultist Slayer (Slayer 7), two Baphomet Cultists (Cle 8 Fig 1), and a Cultist Conjurer (Wiz 7). Three Cultist Archers (Fig 5) pepper them from North of this position. They all have standard treasure. To the South, you can do a DC 20 Mobility check to climb down to area 22.
- Crusaders are battling a Marilith Votary (Fig 12) and two Babau (Outsider 7). The Votary has two +1 Scimitars. Farther up the street to the North are more crusaders battling five Schir (Outsider 5) and ten Dretch (Outsider 2). Standard equipment.
- A column meant to honor the angels who fought and died for Drezen is here. It still radiates holy power and can be used to reduce corruption. East of the column, several Crusaders battle a Nabasu’s Votary (Rng 12) and Schir’s Votary (Fig 9).
- A minor loot stash.
- A Nabasu’s Votary (Rng 12) is here guarding the entrance to the tavern. He has standard equipment and Mithral Chainmail. There is a loot stash to the South, and two loot stashes to the West.
- When you go up these stairs from either side, two Vrock (Outsider 9) will land and attack you (for a total of four Vrocks). They have no treasure. At the top of the stairs (which can only be reached from the North side) is a Shadow Demon’s Votary (Wiz 13) and a Derakni (Outsider 11). Standard equipment. If the gate is not already open, you can call in the troops to knock it down once the enemies are eliminated. You will be faced with four waves of defenders while they do this:
- Wave 1 is two Vrock (Outsider 9)
- Wave 2 is 3 Schir (Outsider 5) and 6 Dretch (Outsider 2)
- Wave 3 is a Derakni (Outsider 11)
- Wave 4 is two Vrock (Outsider 9).
- There is a Vrock corpse and two Crusader bodies here with mundane loot. There is also a handle to open the gate into area 30 if you have not beaten it down from the other side.
- A Marilith’s Votary (Fig 12) and Babau (Outsider 7) guard this gate. The Marilith’s Votary has two +1 Scimitars. If you overcome them, you can call the troops to break the gate down. While the troops are breaking the gate down, you will have to contend with four waves of demons:
- Wave 1 is two Babau (Outsider 7)
- Wave 2 is also two Babau (Outsider 7)
- Wave 3 is a Vrock (Outsider 9)
- Wave 4 is a Vrock (Outsider 9) and two Babau (Outsider 7)
- There are four Dretch (Outsider 2), two Brimorak (Outsider 6), and two Schir (Outsider 5) here. They have standard equipment. At the bottom of the stairs on the West side are two mundane loot stashes, one of them in a locked chest. On the East side are two more loot stashes.
- At the top of the stairs is a Fallen Crusader (Fig 14). He has +1 Full Plate armor and Herald of Pain (+2 Dueling Sword, on a confirmed critical, the target is sickened for 1d4 rounds). While you are fighting him, a Retriever (Construct 15) will come down the wall to the East of the stairs to attack from behind. The Retriever has no treasure.
- There are two Derakni (Outsider 11) waiting here.
- A Cultist Evoker (Wiz 9) is here talking to a Dretch (Outsider 2). If you listen in on the conversation, you will find that he wants through the secret door to the North because he has urgent business with “Sir Vhane” (this turns out to be Joran Vhane, not Staunton, but still someone you want to see). The Dretch hesitates because the three Dretch that had the keys to the door ran off. He knows where two of them are but not the third. (The three keykeepers are in The Temple area 4, Drezen Prison area 8, and The Tavern where the D is.) Once you defeat the Evoker and Dretch, you need all three keys to open the door. The secret door takes you to The Passage, where the main gate’s lever is located. In the North corner of this courtyard, a DC 25 Perception check will reveal a hidden stash containing Scimitar of Wind (+2 Keen Thundering Scimitar, adds +1 to the caster level of the wielder when casting Transmutation spells).
- This is the main gate. If you have eliminated the Giants and opened the two previous gates, you can click on the interactive hand, and your soldiers will commence breaking the gate down. You will need to be ready because you will be attacked in three waves shortly after they start.
- The first wave is a Derakni (Outsider 11).
- The second wave is four Brimorak (Outsider 6) and two Dretch (Outsider 2) for the first round. Second round, they are joined by two Schir (Outsider 5). Fourth round, they are joined by two Vrock (Outsider 9)
- The third wave is a Retriever (Construct 15)
- Inside the gate is the Balor Darrazand (Outsider 20), Nurah the Traitor, and three Babau (Outsider 7). When you first enter, one of the Babau is complaining that the humans are winning. Darrazand crushes him. Nurah makes a comment, Darrazand threatens her, then you are spotted. You will have a chance to make a DC 30 Intimidate check to cause the other two Babau to run before the fight. If Irabeth and/or Queen Galfrey are here in the city with you, they will make an appearance now. Elan of the Houndhearts is back for this battle and helps you. It is not necessary to kill the Babau or even Darrazand. (In truth, you can’t kill Darrazand. Bringing him to zero hp does not end the combat, and he won’t die.) In the fifth round of combat, Greybor (the assassin from Section II, Tower of Elrond) will run in and attack. Darrazand isn’t affected by the attack, knocks Greybor on his butt, curses Willodus (Greybor’s employer), and disappears into a hole in the ground. When you talk to Greybor, he tells you that the dagger he carries was supposed to kill Darrazand with one hit; he was lied to by his employer. He gives you some sound advice about getting inside the castle, amounting to, “You and your group have to do it alone.” After the battle is over, Wilcer Garms moves the temporary camp to this courtyard, which gives your group a resting place. To continue the assault, you need to head up the stairs in the SE corner, run along the wall to the North, and enter the door. This will take you into Citadel Drezen. A DC 4 Perception check in the NW corner reveals a loot stash: a Wand of Good Hope (11 charges), a potion of Feather Step, and a potion of Invisibility.
- When you hang the Banner of Valor, you will be suffused with power and gain your 3rd Mythic Rank. At this time you have to choose your path; Angel, Aeon, Azata, Death, Demon, or Trickster. Once chosen, your path cannot be changed. There are several websites out there that detail the abilities of each of the Mythic Paths, and it takes volumes to do it, so I won’t do it here. Still, I am playing six characters and each one is choosing a different Mythic Path which means I will be able to let you know the effects each path has on the game.
- Standard: A Schir, Baphomet Cultist (Cle 8 Fig 1), and Cultist Archer (Fig 9) are here. The Schir runs as soon as combat starts. In the second round of combat, a Babau appears with a second Cultist Archer. The Babau explodes. The Cultists have standard equipment.
Released Vescavor: Three Vescavar Swarms (Outsider 5) are here. The bodies have mundane treasure.
- This is the entrance to the Citadel’s Main Floor. Before entering this area, make sure you have gathered all of the treasure/equipment/loot in Drezen. Carry all of it with you. You will not be able to retrieve it once you kill Staunton.
Once you have chosen your path, you will see a cutscene with the Crusaders defeating the demons in Drezen, then a second cutscene. This cutscene is a flashback showing the Festival in Kenabres where Areelu Vorlesh cast Feather Fall on you before you fell into the rift. She appears to have saved your life. Her Dretch servant questions the decision. Areelu sends him off to the laboratory while she takes care of a personal matter (which you can assume is what she was doing at the Gray Garrison). Then Yariel appears on the parapet with you and reveals that she is actually Areelu Vorlesh. You have a nice conversation with her, then get 640xp
Standard: After the conversation, three Babau (Outsider 7), a Cultist Archer (Fig 9), and a Deskari Cultist (Cle 1 Fig 8) appear on the next Tower, ready to attack you. Two of the Babau explode as soon as you move toward them, and the third one runs. The Cultists have standard equipment.
Released Vescavor: Two Vescavar Swarms (Outsider 5) are here. No treasure.
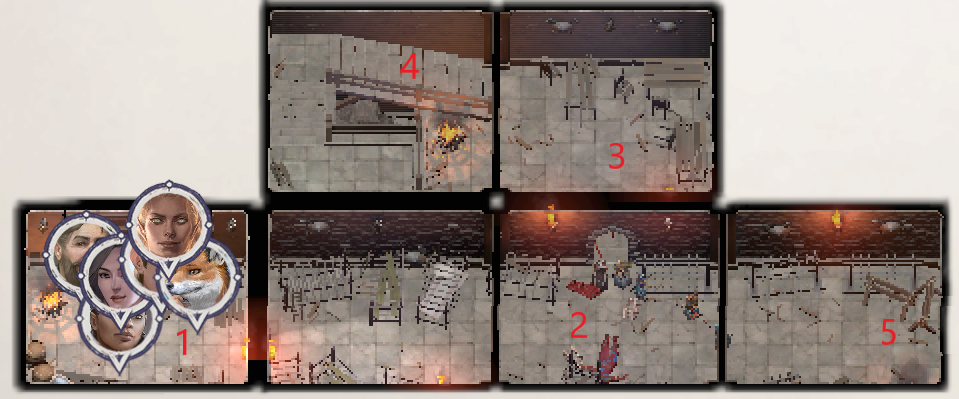
- This door leads to area 8 in Drezen. There are three loot stashes here. One has a Magical Essence. One has Lethal Squall (+2 Thundering Greataxe. Thundering does an extra 1d6 sonic damage on a hit. Target hit must make a DC 20 Fortitude save or the next hit does an extra 5 points of slashing damage.) The third is just ingredients.
- There is a Babau (Outsider 7) demon here. The other creatures from room 3 will come out into the hall and join the fight when combat starts.
- Three Babau (Outsider 7) demons and a Babau Votary Poisoner (Slayer 9) are here. They will join the combat if you attack the Babau in room 2.
- These stairs lead to the roof (see below).
- This door leads to the Lower Roof (see below).
Roof: A Vrock (Outsider 9) is perched here. It will do a Stunning Scream, then come down from its perch to attack as soon as it sees you. It has no treasure. There is a bag of mundane loot against the East wall. Even though this seems to be part of the wall structure for the city, you cannot move onto the wall to get to the Ash giants. A DC 22 Mobility check will get you down to the Lower Roof.
Lower roof: this is just South of Area 5 in Drezen. A DC 20 Mobility check from here will get you back to the roof of the building in area 5. A DC 28 Athletics check will get you up on the roof. When you get here, a Vrock (Outsider 9) will land. The Vrock has no treasure, but there is a loot stash containing some mundane treasure. The door into the barracks is locked.
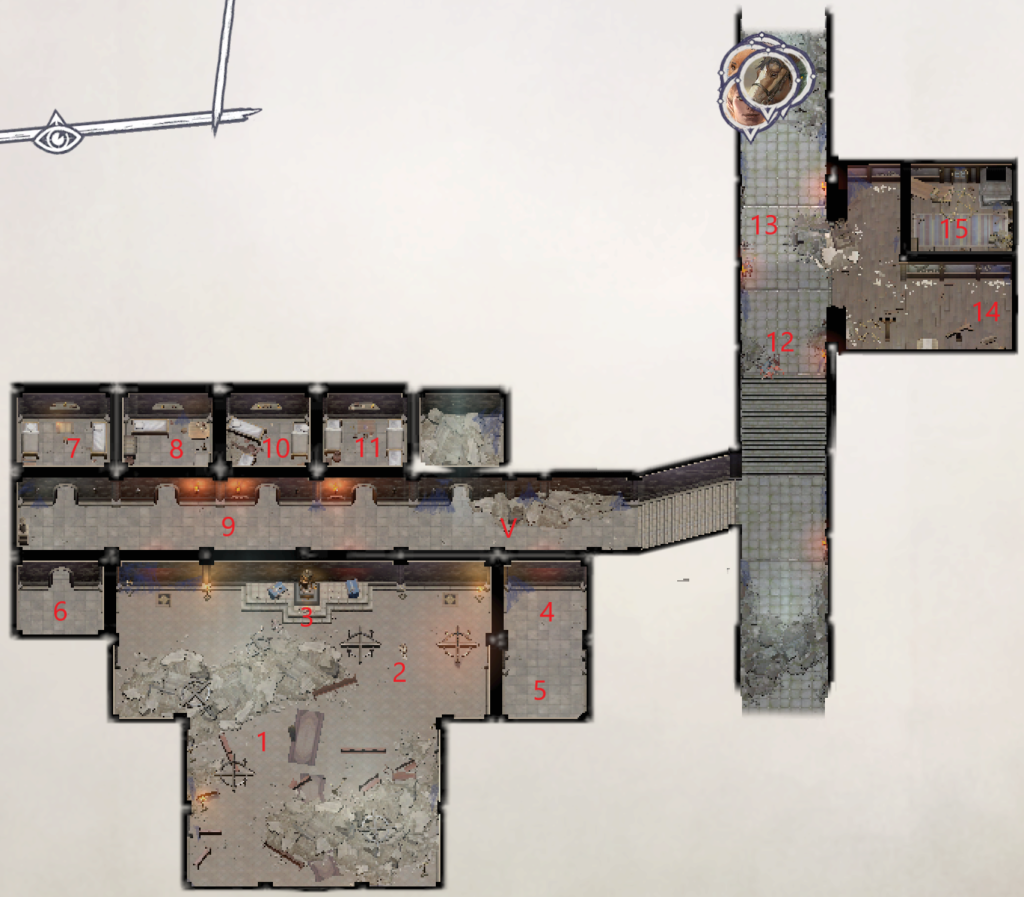
- A Shadow Demon’s Voltari (Wiz 13) is here. He has standard equipment. If you take him out quickly and without moving too far to the East, you won’t have to fight the Mad Kellid in area 2 at the same time.
- A Mad Kellid (Bar 15) is here. His damage reduction makes him a fierce opponent, so you want to try and fight him without having to fight the Voltari in area 1 at the same time. He has a couple of healing potions, a +1 Greataxe, Armor of Dispersion (+2 Hide armor, any time the wearer is hit with a critical attack, the attacker has Dispel Magic cast on him), and a Cloak of Blood Scent (+2 Cloak of Protection, when under the effects of Rage wearer gets a +2 attack bonus against wounded enemies).
- A statue of Iomedae is here. Its holiness is still intact, so interacting with it twice will reduce corruption. A DC 20 Lore (Religion) check next to the statue of Iomedae will reveal that troops used to receive their blessings here before going to battle.
- A single Dretch (Outsider 2) is here. He has a Sooty Steel Key that can be used to open the secret door at area 34 in Drezen. To the South, a DC 23 Perception check will reveal a secret door into area 5.
- There is a cache of supplies here so you can rest, recover spells, and heal. A loot stash here contains an ingredient, but the skeleton has a letter to Queen Galfrey about the days after the taking of Drezen and a Rod of Mysticism (Maximizes three spells from the Oracle/Cleric list per day for spells of 6th level or lower).
- In this room is a minor loot stash.
- There is a loot stash in this room with some minor treasure.
- There is a loot stash in this room with some minor treasure. There is also a locked chest with a couple of scrolls and more treasure.
- There are two traps in this hall. The traps do 11d6 Fire and 11d6 Divine damage if they are not disarmed. Unless you successfully use Stealth to disarm them (or disarm them from a distance or are coming in from area 13 in Drezen), you will be spotted by the Vrock’s Voltari (Cle 14) at the end of the hall (where the ‘V’ is). The Voltari has standard equipment.
- There is nothing in this room except the disarm point for one of the traps.
- This room is empty.
- At the top of the stairs are three Incubus (Outsider 8). They have standard treasure.
- Two bodies in this hall and a box at the far North end have minor treasure.
- This doorway leads to area 13 in Drezen.
- In this room are a minor loot stash and a stash of supplies so you can rest. In the chest is a Triceratops Statuette (can be used once a day to summon a medium triceratops animal companion if the wielder doesn’t already have an animal companion. [This makes an excellent mount for Regill, giving him more maneuverability on the battlefield.] There is no duration for how long the triceratops will stay. The effective Druid level for this companion is the character’s level minus four. His name is Bismuth.)
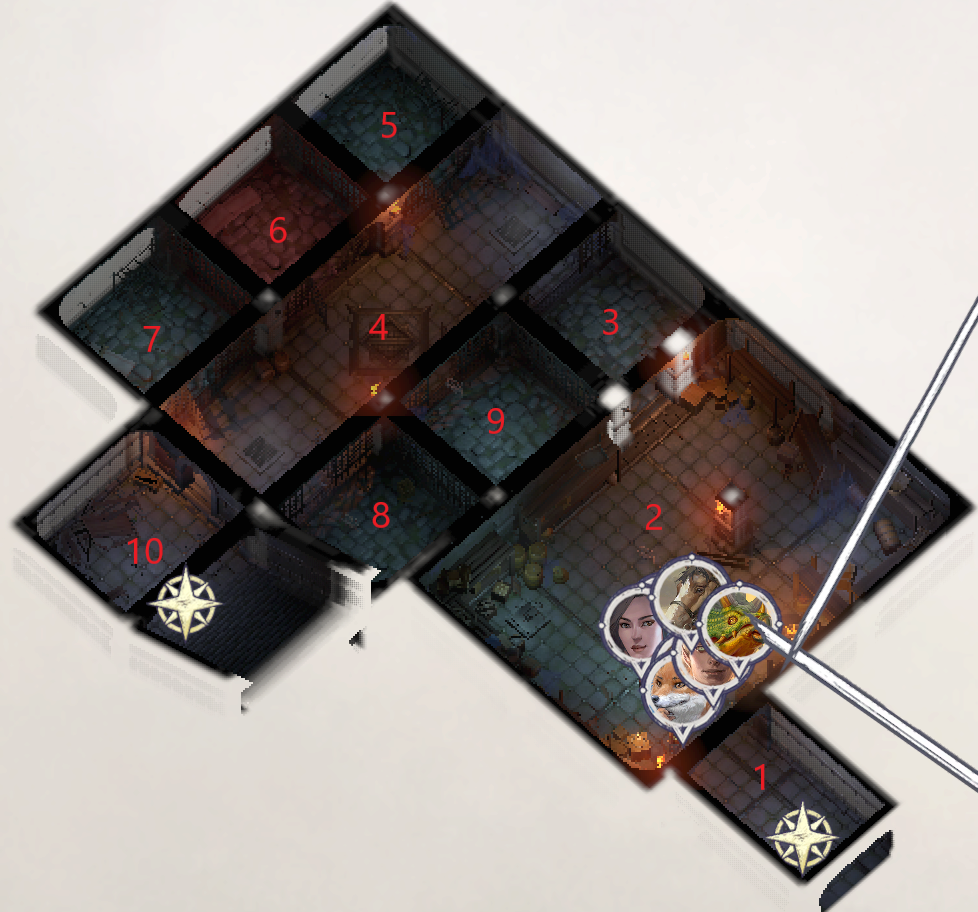
- This is the room you will start in if you accept Nurah’s plan or enter from The Ruins in Drezen.
- There are a lot of loot stashes here, mainly gold and sellable items, but in the Northeast corner is a chest with Quick Death (+2 Javelin, the first hit against a new target does +5 damage). In the chest to the West is a Magic Essence. If you did not fall for Nurah’s trap and were not ambushed, then a Prophet of Baphomet (Minotaur, Cle 12 Mon Hum 6) and two invisible Babau (Outsider 7) are here. They have standard equipment. A DC 20 Perception check will reveal a secret door in the NE corner. Note that if you accepted Nurah’s plan, you will fight all of the guardians of the Prison in one big battle.
- If you weren’t ambushed, a Half-Fiend Furious Minotaur (Bar 4 Mon Hum 6) is here. Once battle is joined, a Cultist Sniper (Slayer 7) starts shooting at you from the hallway (area 3). They have standard equipment.
- At the SW end of this hallway are two Cultist Snipers (Slayer 7). They have standard equipment. You can open the cell doors by using the levers on the floor next to each cell.
- There is nothing in this cell.
- Arueshalae is in this cell. You can’t open this cell until you talk to her. If you are on the Azata path and viewed her from the Alter to Desna in the Lost Chapel area, she will have seen you as an Azata, and you can recruit her as a party member. Singing the Azata song (good action) will cause her to dance and sing with you. Flowers will appear, and she will radiate joy, but this doesn’t have any game effect. If you open the cell, she will go free. Arueshalae will be available as a party member if you have fulfilled the requirements. Otherwise, she leaves without attacking and can be available later. If you attack, Desna saves her with a cloud of butterflies (Arueshalae’s special power is that if she is in mortal danger, Desna will save her with a cloud of butterflies) and she will not be available as a party member in the future. If you leave her in the cell, she is not available as a party member at this time but may be later.
- A prisoner is in this cell, but he says you’ve come too late, and he just wants to die in peace. There is nothing you can do for him.
- In this cell is a prisoner who has gone insane; CN Halfling (Fig 7 Pal 4). He attacks as soon as you open the door. On him are a couple of healing potions and a Shard of Knight’s Bracers (a piece of an artifact that the Storyteller may be able to do something with).
- Pacing in this cell is a Dretch (Outsider 2). I don’t know what a Dretch did to get put in Prison by demons, but he does have a Fire-Damaged Steel Key on him, so he may have stolen it. The key opens the lock in Drezen area 34.
- This exit (or entrance if you came in from this side) lets you out in area 23 in the city.
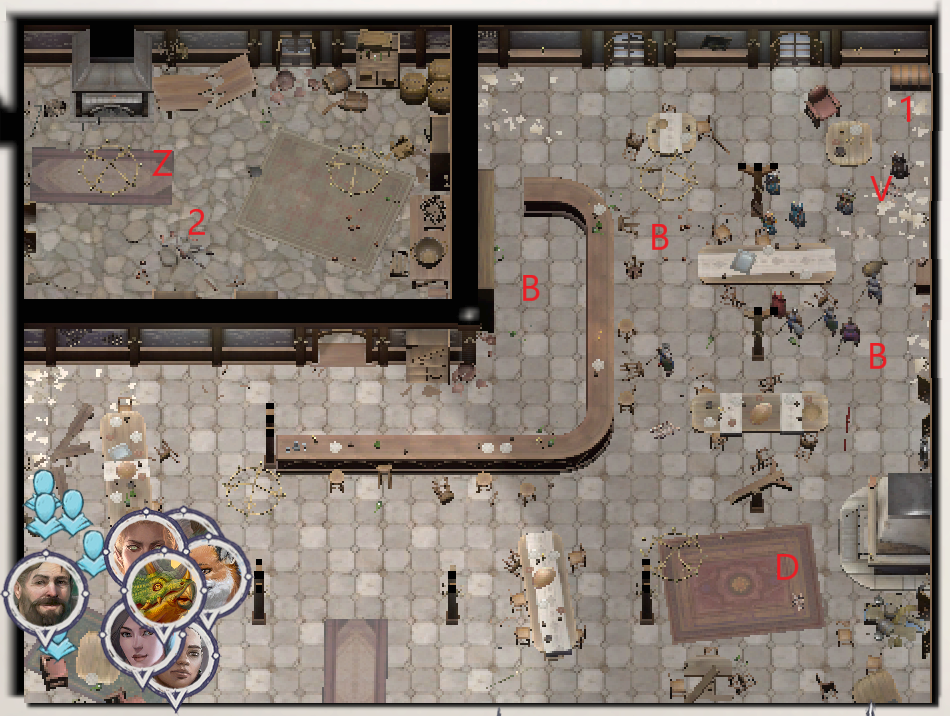
There are several mundane loot stashes throughout the tavern. There are also a few opponents and a couple of items of note.
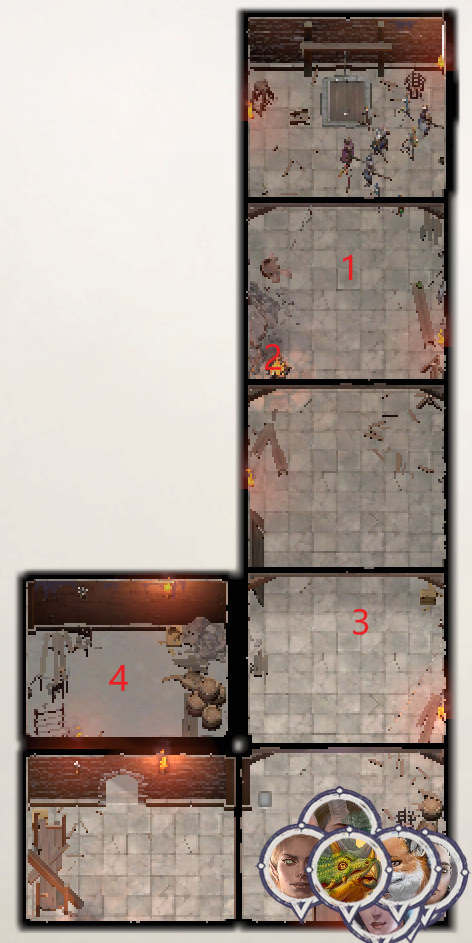
- A trap here will release several Scorching Ray (Cold) on the group, doing 4d6 cold damage. The trap is not difficult to disarm, except that the disarm point is past two Incubi (Outsider 8) who are patrolling the hall and next to two others standing near the end. If you set off the trap or attack the Incubi with arrows, five more will come from around the corner to attack you. If you have someone with a high Stealth, Invisibility may get you past the first two Incubi to disarm the first trap. If not, use Resist Energy Communal (cold) on the group and attack. There’s another trap at area 3, so don’t run forward too quickly. Let them come to you.
- A DC 24 Perception check will reveal some hidden loot here. A Lesser Extend Metamagic Rod.
- A second trap. The disarm point for this one is in area 4.
- If you didn’t start a fight and alert these guards, there is no way to disarm the trap in area three without the five Incubi in this room catching you unless you can do it from a distance. In this room are a couple of mundane loot stashes and a lever. The lever opens the main gate (Drezen, area 35). You get 1280xp when you pull the lever.
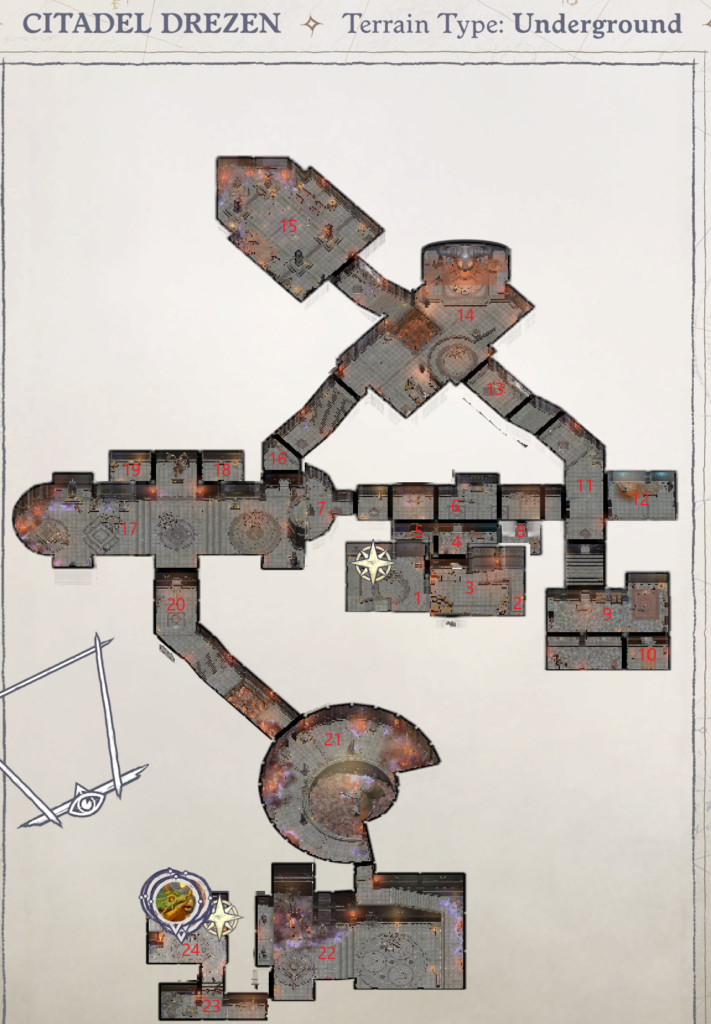
- As soon as the party moves toward the ledge, they should detect a trap. The disarm point is in this room. Having to pause to disarm it is really only to delay the party long enough for the first attack of Whispers of Madness. Whispers of Madness: Every ten minutes, each party member who is not Chaotic Evil must succeed on a DC 14 Will save or lose 2 Charisma. If Charisma is brought to zero, the character dies. The Whispers can be stopped by appeasing the spirits in area 12.
- At the first turn of the ledge are a Schir’s Votary (Fig 9) and a Baphomet Cultist (Cle 8 Fig 1). At the next bend is a Cultist Archer (Fig 9). They have some healing potions and standard equipment.
- There are six loot stashes here, one of which is locked. All mundane stuff.
- In this room hangs Yaniel, the famous Paladin from 70 years ago who sacrificed herself to protect the refugees as they fled Drezen. She is still alive and hanging from the ceiling. (Spoiler: This is not Yaniel, it is actually Areelu Vorlesh in disguise.) If you try to give Radiance back to her, she will refuse it saying her mutilated hand can’t wield the weapon. She will let you know that the Sword of Valor is in this Citadel, but she doesn’t know exactly where. If you free her, she will continue the charade of being Yaniel and let you go. (She will appear again later as Yaniel when you need her.) If you choose not to free her, Seelah will free her anyway. A DC 28 Athletics check can be done on the West wall, which will open up area 5.
- A DC 25 Perception check will reveal Defense by Offense (+2 Mithral Kama, gives the wielder a +1 Dodge bonus to AC). This may be the second weapon stash that Crinuckh the Kobold referred to. There is nothing else of interest in this room.
- Just outside the door is a trap that you need a DC 25 Perception check to see. To the East are four Babau (Outsider 7) and a Cultist Archer (Fig 9) that will attack you as soon as you come through the door. They all have standard equipment.
- A platform overlooking a long room (area 17). There is a chest here with a trap on it. Inside is some mundane treasure and a Helmet of Mental Flow +2 (+2 to Int and Cha). Interacting with the statue will give you a view of several cultists and Fiendish minotaurs guarding what appears to be the Sword of Valor.
- This room has a locked door. Inside are five dead prisoners; two of them have potions of Cure Lt Wounds.
- Inside this library is the vampire, Theruk Nul (Cle 7 Rog 4). The entire South wall is a secret door that requires a DC 32 Perception check will reveal. On the other side of that wall are three Theruk’s Spawn (Rog 3 Undead 4). Once the battle begins, the South wall will disappear, and the three Theruk’s Spawn will attack if you don’t begin the battle with them. One of them will hang back and use Dominate on your party members. The Spawn have standard equipment. Theruk Nul seems to disintegrate when killed. A DC 32 Perception check will spot a secret door in the SW corner that a DC 28 Athletics check will open. There are several mundane loot stashes here.
- This is where Theruk Nul keeps his coffin. There is a trap on the floor in front of the coffin that a DC 22 Perception check will reveal. You can elect to kill the vampire while he is helpless in his coffin. This will give you Tender Touch (+2 Necrotic Rapier, when the wielder casts Vampiric Touch it does 1d8 damage instead of 1d6, necrotic does an additional 1d6 damage against living targets). In the locked chest is Eluding Target (+2 Buckler, wielder gets +2 Dodge bonus to AC against two-handed weapons). There is also some mundane treasure here.
- In this hallway is another trap. Patrolling the hallway is a Fiendish Minotaur Assaulter (Mon Hum 6 Slayer 6). He has a mwk Handaxe and a +1 Handaxe.
- Through this door are the spirits that are creating the Whispers of Madness. The body on the table is a holy martyr. If you interact with her twice, it will lower the effects of corruption. You can also loot the body and get full plate armor, gold, a lt crossbow, and Bastard Sword of Hope (+2 Mithral Longsword, whenever a critical is confirmed by the sword, the wielder is healed for 1d8+5hp, can only be wielded by LG, LN, or NG characters). A DC 22 Arcana check on the alter next to the table reveals that the maddened spirits contained here are the source of the Whispers of Madness. Left to right, you will need to succeed on a DC 30 Lore (Religion) check, DC 21 Knowledge (World) check, and a DC 25 Knowledge (Arcana) check to stop the Whispers. Failure on any of these checks brings three Specters (Undead 8), or a single specter and a Corpulent Specter (Undead 8) through the walls to attack you (you get no xp for defeating the specters, and they have no treasure). Successfully disabling all three sets of spirits gets you 360xp (in addition to what you got for each successful check).
- At the bottom of the stairs are four Schir (Outsider 5). They have standard equipment.
- Joran Vhane (Cle 13) is here. He gets up from his forge and starts a dialogue with you. He has the Scabbard for Radiance that he promised you in Kenabres. The Scabbard adds to Radiance’s power (it becomes a +2 Cold Iron Longsword). (Radiance is now in your inventory instead of being wielded by whichever character has it, so make sure you equip it at your first opportunity). Regardless of your dialogue choices, Joran gives you the Scabbard, and you will have to fight him. You get several alignment choices if you try to leave without attacking, but you will still fight. Joran has a +1 Warhammer, +1 Breastplate armor, and a +1 Ring of Protection. On the floor next to the chest is Solemn Hour, Irabeth’s family sword (+2 Cold Iron Evil Outsider Bane Longsword, Bane gives an extra +2 to hit and +2d6 damage against evil outsiders). In the chest is some mundane stuff and Rabid Underdog (+2 Heavy Pick, automatically confirms critical hits against creatures large size or bigger). Inspecting the forge shows that this is not an ordinary fire. There are several loot stashes in the SW corner of the room and a Fiendish Minotaur Assaulter (Mon Hum 6 Slayer 6). The loot is mundane stuff; the Assaulter has a mwk Handaxe and a +1 Handaxe. Joran’s sleeping area is here.
- There are seven Cultist Conjurers (Wiz 11) here. They are casting Dark Sacrifice and giving their lives to power the summoning of a really big demon, Blightmaw. You only have to kill one of the Conjurers to make the summoning fail. Chorussina (Wiz 16) is in the center of the circle. You cannot attack her until all of the other wizards are dead, then she says something about using your heart for the sacrifice, blah, blah, and she attacks. If you don’t succeed in killing at least one of the Conjurers (or choose not to), they will summon Blightmaw (Bar 6 Outsider 12). A particularly nasty piece of work capable of doing a lot of damage in a single round. If you kill Blightmaw, you get 10,368xp (which is why you might choose to let them finish the ritual) and has Ring of Chaotic Fascination (+2 Ring of Protection, +2 to the DC of any Enchantment spells cast by the wearer, +2 bonus to saves vs. Enchantments) The Conjurers all have scrolls and mwk daggers, Chorussina has a +1 Ring of Protection, +1 Agile Dagger (agile means wielder can apply Dex modifier to damage instead of Str), and Lucky Dice (randomly gives +1 to attack, damage, or AC on an enemy’s attack once per day, the effect lasts the whole day). The chest has several scrolls.
- At the bottom of these stairs is a trap, easily disarmed. The door leads to the long room you viewed from area 7.
- At the end of this long room are a Schir’s Votary (Fig 9), Half-Fiend Furious Minotaur (Bar 4 Mon Hum 6), Cultish Archer (Fig 9), and Cultish Evoker (Wiz 9). They have standard equipment except for the Cultish Evoker, who has a slime-covered key. The chest is trapped and locked. Inside is a pair of Lesser Bracers of Archery (wearer can use any bow with proficiency and gets a +1 competency bonus to attacks with bows). You don’t want to interact with the Sword of Valor (the big pennant) at this time; it is trapped and will send Waves of Exhaustion throughout the room. Once the trap is sprung, several demons will teleport in to attack you. If you disable the traps in rooms 18 and 19, you can face the demons without fatigue. Once you interact with the pennant (spoiler, this isn’t really the Sword of Valor), a Babau (Outsider 7) and four Brimorak (Outsider 6) will appear to attack you. After a couple of rounds of combat, three more Babau, a Vrock (Outsider 9), and an Elder Vrock (Outsider 9) will teleport in. They all have standard equipment except the Elder Vrock, who has a +3 Amulet of Natural Armor.
- A DC 24 Perception check is needed to find the secret door to this room. Inside is a trap, easily disarmed. You can do a DC 25 Lore (Religion) check to disable the Waves of Fatigue trap at the East end of the room. Failing the check causes 6d6+3 Unholy Damage to whoever tried.
- A DC 30 Perception check is needed to find the secret door to this room. Inside is another trap, easily disarmed. You can do a DC 24 Knowledge (Arcana) check to disable the Waves of Fatigue trap at the West end of the room. Failing the check causes 6d6+3 Unholy Damage to whoever tried.
- There is a trap in this corridor. There is also a Half-Fiend Furious Minotaur (Bar 4 Mon Hum 6) patrolling just beyond the trap. The Minotaur has standard equipment.
- As soon as you enter the room, waves of ghouls start coming out of the pit in the center. (Listed below is apparently the worst-case scenario, I had one group that destroyed all three ghouls in round one before the end of the round, then did the same thing in round two. No more ghouls came out, and the Nabasu didn’t appear.)
- Rnd 1 – Two Ghouls (Undead 2), one Ghoul Creeper (Rog 3 Undead 2)
- Rnd 2 – Two Ghoul Creepers, one Ghoul Stalker (Rog 6 Undead 2)
- Rnd 3 – Two Ghouls, Two Ghoul Creepers
- Rnd 4 – Three Ghoul Creepers, one Ghoul Stalker
- Rnd 5 – One Ghoul, one Ghoul Creeper, one Ghoul Stalker, two Ghoul Huntmasters (Rng 6 Undead 2), and a Nabasu (Outsider 9)
- Rnd 6 – One Ghoul Creeper, one Ghoul Stalker
- Rnd 7 – One Ghoul Creeper, one Ghoul Huntmaster
- When you enter this room, you are treated to a cutscene showing two statues that spew Acidic Spray and Cone of Cold across the path to the Sword of Valor. You can just do a run to the Sword and retrieve it. You will be subject to a few acid and cold attacks doing 13d6 damage each. You might make it with the right resistances, reflex saves, and evasion. Retrieving the Sword of Valor will disarm the traps. But if you’d rather solve the puzzle:
The Solution to the Sword of Valor puzzle
Note: It is very important to wait for the discs to stop rotating before pushing another button. If you don’t wait, the timing will be off, and there is no reset that I could find.
Turn the camera so that the compass pointer is facing East (two big circles and one button at the top of the screen, two buttons and one big circle at the bottom of the screen). Push the bottom right button once and wait for the disks to stop rotating, bottom left twice, waiting till the disks stop rotating each time, then the center twice, making sure to wait until the disks stop rotating each time.
If you retrieve the Sword of Valor without solving the riddle, you get 1280xp, and Eustoyriax (Outsider 7 Rog 9) will appear with two Shadow Demons (Outsider 7) to attack you. Eustoyriax has a scroll but no other treasure. After that fight, an Abrikandilu’s Votary (Bar 11) and Baphomet Cultist (Cle 8 Fig 1) run into the room, wanting to know who is making all the noise. They are joined by a Nabasu (Outsider 9) in the second round of combat. They have standard equipment.
If you solve the riddle, Eustoyriax (Outsider 7 Rog 9) and two Shadow Demons (Outsider 7) appear and attack you. Eustoyriax has a scroll but no other treasure. When you retrieve the Sword of Valor, you get 1408xp plus 240xp. An Abrikandilu’s Votary (Bar 11) and Baphomet Cultist (Cle 8 Fig 1) then run into the room, wanting to know who is making all the noise. They are joined by a Nabasu (Outsider 9) in the second round of combat. They have standard equipment.
The two chests at the East end of the room are locked and contain only mundane treasure. The chest under where the Sword of Valor was hanging is also locked and contains a +2 Evil Outsider Bane Spear (Bane gives +2 to attack and +2d6 to damage against Evil Outsiders).
- There is a trap on the floor of this hallway. The bones at the end of the hallway show signs of having been gnawed on.
- When you go up the stairs from this room, you will be on the highest point of the wall overlooking the city. You have only one option here, to hang the banner. This is area 37 in Drezen.
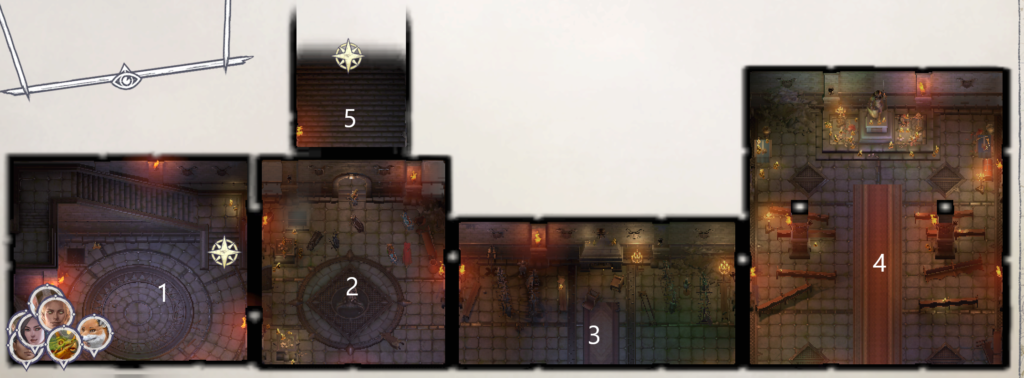
- You can go back out to the walls (the hand labeled Drezen), go up the Tower, or enter the Citadel from this room. If you go up the Tower to the summit, you will see a chest. In the chest is Headcracker (+2 Mithral Light Mace, whenever an opponent is hit for the first time, they must make a DC 15 Fortitude save or be stunned for 1d3 rounds). A Coloxus Marauder (Outsider 16) and Coloxus (Outsider 16) appear and attack you when you open the chest. They have no equipment.
- When you enter this room, a Schir’s Votary (Fig 9), Cultist Evoker (Wiz 9), and Half-Fiend Furious Minotaur (Bar 4 Mon Hum 6) come from the other two rooms to attack you. They have standard equipment. There is an urn in the room with some gold.
- There are two boxes in this room with mundane treasure.
- A couple of steps into this room is a trap with the disarm point on the West wall at the room's north end. At the North end of the room are an Omyx Befouler (Outsider 13) and two Omyx (Outsider 13). They will come toward you and attack as soon as you get into the room. (I had my fastest character go in, get their attention, then run out to the rest of the group so that I could kill them in room 3 and not set off the trap.) The chest has some mundane treasure and a +1 Longsword. The urn has mundane treasure. A DC 25 Perception check in the NE corner will reveal a loose brick with some mundane treasure behind it.
- These stairs lead to the Citadel Command.
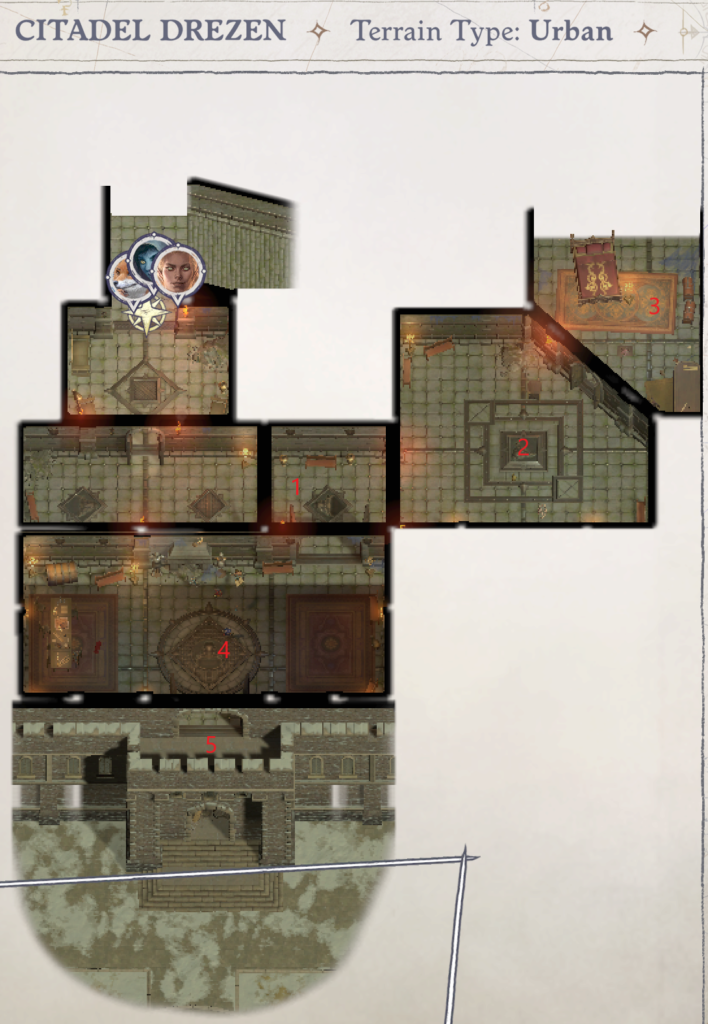
Citadel Command
Before going to the second floor, make sure you have all of the treasure you’ve acquired up till now, just like when you were attacking the Gray Garrison. It’s a lot of money, and you will need all of it. As soon as you get to the second floor, drop enough of it to get to light encumbrance, then after the battle with Staunton, pick it all up before leaving the Citadel.
- Walking down this hall is a Half-Fiend Furious Minotaur (Bar 4 Mon Hum 6). As soon as battle is joined, two Cultist Archers (Fig 11), a Cultist Evoker (Wiz 9), and a Kalavakus (Outsider 10) from room 2 will attack. They have standard equipment.
- In this room is a table with some mundane treasure.
- Two Schir (Outsider 5) are in here. They have standard equipment. There may be treasure in the two chests (my rogue who chose the Demon Mythic Path got treasure, none of my other characters did). Mundane stuff that can be sold, nothing special.
- Staunton Vhane (Warpriest 16), Minagho (Outsider 17 Witch 11), and Nurah (Bard 11) are here. Minagho is trying to get Staunton to leave, but he seems reluctant. Once your presence is noted, you can engage in dialogue with the three of them. (You may be given the option of calling on your diety for help, e.g., calling on Calistra gives +1 att, +1 AC, +1 Reflex saves, and you are surrounded by insects that seem to protect you.)
You don’t need to kill or even fight Minagho or Nurah; killing Staunton cause Minagho to take her power from Staunton and flee.
Once Minagho has fled, regardless of your dialogue choices, you have to kill Staunton and fight Nurah until she surrenders. At which time you can talk to her. She whines, she blames you, she is defiant, and you can kill her, put her in prison, or let her go.
Staunton has Soulshearer (+3 Adamantine Glaive; when wielder kills an opponent in combat, a demon is summoned until the end of combat. Only one demon can be summoned per combat, but subsequent kills heal the demon 1d8+5hp and give a stacking +1 to attacks. Killing more powerful opponents summons more powerful demons.), Carapace (+2 Mithral Full Plate; when the wearer is hit, the attacker must make a DC 15 Reflex save or suffer 1d3 Strength damage. Succeeding on the save means the attacker takes 1d3 piercing damage instead.), a Belt of Physical Form +2 (+2 to Dexterity and Constitution), a Headband of Inspired Wisdom +2, and a Cloak of Resistance +1.
Nurah has a +1 Lt Crossbow, Chainshirt +1, Ring of Protection +1, Cloak of Resistance +1, and an Amulet of Epic Songs (+2 Natural Armor bonus, the wearer gets 6 additional rounds of Bardic Performance ability per day if the wearer has this ability), a scroll of Corrosive Touch, and potions of Invisibility, Protection from Good, Feather Step, and Cure Serious Wounds. Note that you only get these items if you kill Nurah, not if you put her in Prison or let her go.
In the chest by the table is some mundane loot. A DC 25 Perception check on the West wall will reveal another loot stash.
- You can stand here and look out. There isn't anything to see really, but it looks pretty clean considering all of the war and stuff that's been happening.
Conclusion
And that ends section III. You are now in command of Drezen. When you exit the Citadel you will be met by Queen Galfrey (if she was present for the battle) and Irabeth. But all of that is covered in Section IV: Drezen.
Army Quests
Opening
A reminder before you start this first army quest. Pay for the reinforcements from Irabeth, recruit every available soldier, and hire a general right off the bat. If you've done that you should have 266 footmen, 94 archers, and 20 clerics in your army. Which generals you have available is random. If you can choose one that lets you have four different types of units in your army, because you will be getting other unit types fairly early.
This quest is comprised of three parts, Destroy the Cultists who attacked Kenabres before they get back to their demon masters, recover the crusader artifacts that were lost, and clear the path to the first fort on your way to Drezen.
The first battle will be with the cultists. Their army consists of 15 Cultists and 5 Cultist Fighters. Have your archers concentrate on the Cultists first. They have a movement of 4 so they can get to your army pretty quickly. Your footmen and clerics should defend the first turn rather than getting into range of the enemy. If your lucky your archers will wipe out the cultists on the first turn, then weaken the cultist fighters enough on the second turn that your footmen can finish them off without taking any losses. Victory gives you 600 finance points to recruit more troops when they come available, and your general gets 135xp.
The next army you should attack is the one blocking the river crossing. You have five level 1 demon armies on the map (including the one you just wiped out) and it is a good idea to give your general some experience before taking on the level 4 group guarding the crusader artifacts. The blocking army consists of 3 Brimorak demons, 30 Cultists, and 10 Cultist Fighters. This time you need to concentrate on the Brimorak. They can cast fireballs on your units and cause a lot of damage if they get in range.
The fort is a slightly more difficult battle, despite it being listed as a level 1 demon army. The reason is that there is a general present. He adds 2 to the defense of his troops and can cast spells to weaken yours. You are facing 20 Cultist Fighters and two units of 25 Cultists each. As before, concentrate your archers on the Cultists to weaken them before they get witin range of your troops. Winning this battle gives you access to both sides of the river, possession of the fort, and 1000xp for your general. That will get your general to 2nd level.
Once you have killed the nearby level 1 demon armies, it will be time for you to head South to complete the quest by liberating the Crusader artifacts. There is a level 1 demon army that consists of two swarms of 30 Giant Flies each. Giant Flies have a movement of 5, so you aren't going to be able to kill them before they get to you. The best strategy is to arrange your army (on the form that comes up when you click on the name of the army at the lower left side of your screen) so that your archer(s) are on the back row behind your footmen and clerics. That way none of the Flies can get to your archers and you can limit your losses. You get 1000 finance points for this battle, and it should be enough xp for your general to get him or her to level 3.
Once that group is defeated you are ready for the big group that actually has the artifacts. It is a level 4 demon army and consists of five units of 40 Giant Flies. Don't move anybody from their starting positions, you need to make sure that none of your units get surrounded. Watch your infirmiry meter closely and when it starts to fill up, have your clerics start healing themselves and other units so that you won't lose any troops after the battle is over. If you have four units, your archers should be able to wipe out about half a Wasp unit each turn, and the footmen should be able to do the same. Use your general's abilities here and don't worry about saving energy. This is a tough battle. Once you win you will get a suit of+2 Breastplate and The Crest of fallen Knight Mallander Linds. Completing the quest gives your characters 400xp.